文件NIO
1. FileChannel
FileChannel是一个抽象类,不能直接通过构造方法创建实例,两种办法:
- FileChannel类提供了静态的
open()方法 - 通过FileInputStream(只能读)、FileOutputStream(只能写)和RandomAccessFile类(读写都可以)都提供了
getChannel()方法得到
需要注意的时候FileChannel只能工作在阻塞模式下,因为它并不能和Selector配合使用。
1.1 读取文件
FileChannel读取数据到Buffer中的示例:
Path path = Paths.get("C:\\Program Files (x86)\\Sangfor\\SSL\\Log\\SangforServiceClient.exebak.log");
// 创建FileChanel
try (FileChannel channel = FileChannel.open(path, StandardOpenOption.READ)) {
    ByteBuffer buffer = ByteBuffer.allocate(1024);
    int bytesRead;
    int readPosition = 0;
    List<Byte> buff = new ArrayList<>();
    // 读取数据到buffer, 返回channel读取的字节数,文件较大每次返回1024
    while ((bytesRead = channel.read(buffer)) != -1) {
        // 累计读取的字节数
        readPosition += bytesRead;
        buffer.flip(); // 切换为读模式
        while (buffer.hasRemaining()) {
            byte b = buffer.get();
            buff.add(b);
        }
        buffer.clear(); // 清空缓冲区,准备下一次读取
    }
    byte[] array = new byte[readPosition];
    for (int i = 0; i < buff.size(); i++) {
        byte b = buff.get(i);
        array[i] = b;
    }
    String s = new String(array, Charset.forName("gb2312"));
    System.out.println(s);
} catch (IOException e) {
    e.printStackTrace();
}1.2 向FileChannel写数据
public static void main(String[] args) {
    Path path = Paths.get("output.txt");
    String data = "Hello, FileChannel!";
    try (FileChannel channel = FileChannel.open(path, StandardOpenOption.CREATE, StandardOpenOption.WRITE)) {
        ByteBuffer buffer = ByteBuffer.wrap(data.getBytes());
        channel.write(buffer);
    } catch (IOException e) {
        e.printStackTrace();
    }
}1.3 某个特定位置读/写
需要某个特定位置进行数据的读/写操作, 可以通过调用position()方法获取FileChannel的当前位置。也可以通过调用 position(long pos)方法设置FileChannel的当前位置。
long pos = channel.position();
channel.position(pos + 123); // 当前位置向后移动123进行读写操作如果将位置设置在文件结束符之后,然后试图从文件通道中读取数据,读方法将返回- 1 (文件结束标志)。 如果将位置设置在文件结束符之后,然后向通道中写数据,文件将撑大到当前位置并写入数据。这可能导致"文件空洞",磁盘上物理文件中写入的数据间有空隙。
空洞文件的两个应用场景:
- 在使用迅雷下载文件时,还未下载完成,就发现该文件已经占据了全部文件大小的空间,这也是空洞文件;下载时如果没有空洞文件,多线程下载时文件就只能从一个地方写入,这就不能发挥多线程的作用了;如果有了空洞文件,可以从不同的地址同时写入,就达到了多线程的优势;
- 在创建虚拟机时,你给虚拟机分配了100G的磁盘空间,但其实系统安装完成之后,开始也不过只用了3~4G的磁盘空间,如果一开始就把100G分配出去,资源是很大的浪费。
1.4 获取文件大小
// 获取文件大小
long fileSize = outChannel.size();1.5 截取文件
可以使用 FileChannel.truncate()方法截取一个文件。截取文件时,文件将中指定长度后面的部分将被删除。如:
channel.truncate(1024); //截取文件的前1024个字节1.6 强制写到磁盘
FileChannel.force()方法将通道里尚未写入磁盘的数据强制写到磁盘上。出于性能方面的考虑,操作系统会将数据缓存在内存中,所以无法保证写入到FileChannel里的数据一定会即时写到磁盘上。要保证这一点,需要调用force()方法。force()方法有一个boolean类型的参数,指明是否同时将文件元数据(权限信息等)写到磁盘上。
1.7 多个FileChannel交互
如果两个通道中有一个是FileChannel,那你可以直接将数据从一个channel传输到另外一个channel。
transferFrom(): 可以将数据从源通道传输到FileChannel中transferTo(): 将数据从FileChannel传输到其他的channel中, 底层会利用操作系统的零拷贝进行处理.
public static void main(String[] args) throws IOException {
    RandomAccessFile aFile = new RandomAccessFile("C:\\Users\\mi\\Downloads\\aa.txt", "rw");
    FileChannel fromChannel = aFile.getChannel();
    RandomAccessFile bFile = new RandomAccessFile("C:\\Users\\mi\\Downloads\\bb.txt", "rw");
    FileChannel toChannel = bFile.getChannel();
    long size = fromChannel.size();
    // 直接覆盖
    // toChannel.transferFrom(fromChannel, 0 , size);
    // 两个文件合并, 起始位置若是toChannel.size()+1,将有一个未知字符
    toChannel.transferFrom(fromChannel, toChannel.size() , size);
    toChannel.close();
    fromChannel.close();
    System.out.println("over");
}public static void main(String[] args) {
Path filePath = Paths.get("D:\\Virtual Machines\\hadoop105\\hadoop105-Snapshot2.vmem");
Path targetPath = Paths.get("D:\\result.vmem");
try (
FileChannel sourceChannel = FileChannel.open(filePath, StandardOpenOption.READ);
FileChannel targetChannel = FileChannel.open(targetPath, StandardOpenOption.WRITE, StandardOpenOption.CREATE);
) {
// 第二个参数表示要传输的最大字节数
sourceChannel.transferTo(0, sourceChannel.size(), targetChannel);
}catch (Exception e){
e.printStackTrace();
}
}2. Path
Path实例表示文件系统中的路径。一个路径可以指向一个文件或一个目录。
路径可以是绝对路径,也可以是相对路径。Path支持特殊路径:. 代表了当前路径.. 代表了上一级路径。
2.1 创建Path实例
可以使用Paths工具类中的静态方法get()来创建路径实例。
Path path = Paths.get("d:\\jack\\001.txt");2.2 创建绝对路径
创建绝对路径,通过调用get()方法,给定绝对路径文件作为参数来完成。
Path path = Paths.get("d:\\jack\\001.txt");2.3 创建相对路径
使用Paths.get(basePath, relativePath)方法创建一个相对路径。
//代码 1
Path projects = Paths.get("d:\\jack", "projects");
//代码 2
Path file = Paths.get("d:\\jack", "projects\\002.txt");2.4 Path.normalize()
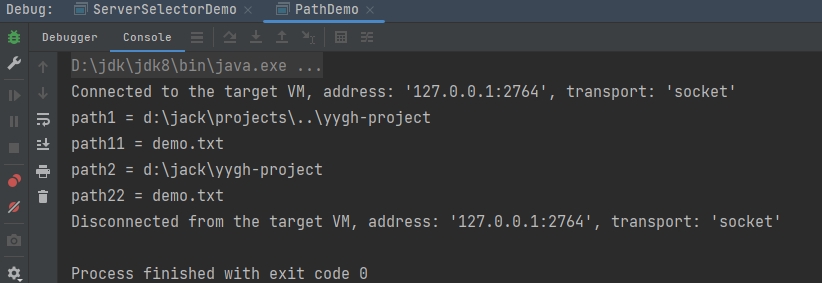
Path接口的normalize()方法可以使路径标准化,更加直观。标准化意味着它将移除所有在路径字符串的中间的.和..代码,并解析路径字符串所引用的路径。
public static void main(String[] args) {
    String originalPath = "d:\\jack\\projects\\..\\yygh-project";
    String path = "demo.txt";
    Path path1 = Paths.get(originalPath);
    Path path11 = Paths.get(path);
    System.out.println("path1 = " + path1);
    System.out.println("path11 = " + path11);
    Path path2 = path1.normalize();
    Path path22 = path11.normalize();
    System.out.println("path2 = " + path2);
    System.out.println("path22 = " + path22);
}
3. Files
Files工具类提供了几种操作文件、文件夹的方法
3.1 Files.createDirectory()
用于根据Path实例创建一个新目录
Path path = Paths.get("d:\\sgg");
try {
    Path newDir = Files.createDirectory(path);
    // 创建多级目录
    Path newDir2 = Files.createDirectories(path);
} catch(FileAlreadyExistsException e){
    // 目录已经存在
} catch (IOException e) {
    // 其他发生的异常
    e.printStackTrace();
}3.2 Files.copy()
- Files.copy()方法从一个路径拷贝一个文件到另外一个目录
Path sourcePath = Paths.get("d:\\demo\\01.txt");
Path targetPath = Paths.get("d:\\demo\\002.txt");
try {
    Files.copy(sourcePath, targetPath);
} catch(FileAlreadyExistsException e) {
    // 目录已经存在
} catch (IOException e) {
    // 其他发生的异常
    e.printStackTrace();
}警告
如果目标文件已经存在,则抛出一个java.nio.file.FileAlreadyExistsException异常。如果有其他错误,则会抛出一个IOException。例如将该文件复制到不存在的目录,则会抛出IOException。
- 覆盖已存在的文件
Files.copy(sourcePath, destinationPath, StandardCopyOption.REPLACE_EXISTING);3.3 Files.move()
Files.move()用于将文件从一个路径移动到另一个路径。移动文件与重命名相同,但是移动文件既可以移动到不同的目录,也可以在相同的操作中更改它的名称。
Path sourcePath = Paths.get("d:\\jack\\01.txt");
Path destinationPath = Paths.get("d:\\jack\\001.txt");
try {
    Files.move(sourcePath, destinationPath, StandardCopyOption.REPLACE_EXISTING);
} catch (IOException e) {
    //移动文件失败
    e.printStackTrace();
}3.4 Files.delete()
Files.delete()方法可以删除一个文件或者空目录。如果delete()不能删除文件(例如,文件或目录不存在),会抛出一个IOException。
Path path = Paths.get("d:\\jack\\001.txt");
try {
    Files.delete(path);
} catch (IOException e) {
    // 删除文件失败
    e.printStackTrace();
}3.5 Files.walkFileTree()
Files.walkFileTree()方法包含递归遍历目录树功能,将Path实例和FileVisitor作为参数。Path实例指向要遍历的目录,FileVisitor在遍历期间被调用。FileVisitor是一个接口,必须自己实现FileVisitor接口,并将实现的实例传递给walkFileTree()方法。在目录遍历过程中,您的FileVisitor实现的每个方法都将被调用。如果不需要实现所有这些方法,那么可以扩展SimpleFileVisitor类,它包含FileVisitor接口中所有方法的默认实现。FileVisitor接口的方法中,每个都返回一个FileVisitResult枚举实例。FileVisitResult枚举包含以下四个选项:- CONTINUE 继续
- TERMINATE 终止
- SKIP_SIBLING 跳过同级
- SKIP_SUBTREE 跳过子级
/**
 * maven项目运行之前需要从远程拉取jar到本地库里面,期间会因为网络等原因发生jar下载失败事故,项目运行报错,于是手动撸了一个分析扫描本地maven库的代码
 */
public static void main(String[] args) throws IOException {
    //  扫描的本地maven库路径
    Path startDir = Paths.get("F:\\mvnrepository");
    // 利用walkFileTree递归遍历文件夹
    Files.walkFileTree(startDir, new FindJarVisitor());
}

static class FindJarVisitor extends SimpleFileVisitor<Path> {

    boolean existJarFlag = false;
    // 遍历文件前
    @Override
    public FileVisitResult preVisitDirectory(Path dir, BasicFileAttributes attrs) throws IOException {
        // 跳过隐藏目录
        if (dir.getFileName().toString().startsWith(".")) {
            return FileVisitResult.SKIP_SUBTREE;
        }
        return FileVisitResult.CONTINUE;
    }
    // 遍历文件后
    @Override
    public FileVisitResult postVisitDirectory(Path dir, IOException exc) throws IOException {
        //   如果不存在jar包并且当前目录是数字文件夹则打印可能有问题的maven路径, 因为按照maven的gav规
        // 范,v表示版本即数字,正常的maven目录结构是version同名文件夹放置jar包
        if(!existJarFlag && dir.getFileName().toString().matches("^\\d+(\\.\\d+)?$")) {
            System.out.println(dir);
        }else {
            existJarFlag = false;
        }
        return FileVisitResult.CONTINUE;
    }
    // 遍历文件时
    @Override
    public FileVisitResult visitFile(Path file, BasicFileAttributes attrs) throws IOException {
        //  发现文件夹下面有jar包, 标识当前maven的依赖包已存在
        if(file.toString().endsWith("jar")) {
            existJarFlag = true;
            return FileVisitResult.SKIP_SIBLINGS;
        }
        return FileVisitResult.CONTINUE;
    }
}值得注意的是walkFileTree()方法使用了访问者模式。
3.6 Files.walk()
Files.walk()主要依赖Stream API进行操作,对于简单的文件树遍历和过滤操作比较方便。
// 拷贝多级目录
public static void main(String[] args) throws IOException {
    String sourcePath = "F:\\WebstormProjects";
    String targetPath = "F:\\WebstormProjectsAA";
    Files.walk(Paths.get(sourcePath)).forEach(path -> {
        Path copyPath = Paths.get(path.toString().replace(sourcePath, targetPath));
        try {
            // 如果是目录,创建目录,如果是文件,复制文件
            if (Files.isDirectory(path)) {
                Files.createDirectory(copyPath);
            } else {
                Files.copy(path, copyPath);
            }
        } catch (IOException e) {
            throw new RuntimeException(e);
        }
    });
}4. AsynchronousFileChannel
请参考文件aiob笔记
5. 字符集Charset
5.1 Charset 常用静态方法
public static Charset forName(String charsetName)//通过编码类型获得 Charset 对象public static SortedMap<String,Charset> availableCharsets()//获得系统支持的所有编码方式public static Charset defaultCharset()//获得虚拟机默认的编码方式public static boolean isSupported(String charsetName)//判断是否支持该编码类型
5.2 Charset 常用普通方法
public final String name()//获得 Charset 对象的编码类型(String)public abstract CharsetEncoder newEncoder()//获得编码器对象public abstract CharsetDecoder newDecoder()//获得解码器对象
public static void main(String[] args) throws CharacterCodingException {
    Charset charset = Charset.forName("UTF-8");
    //1.获取编码器
    CharsetEncoder charsetEncoder = charset.newEncoder();
    //2.获取解码器
    CharsetDecoder charsetDecoder = charset.newDecoder();
    //3.获取需要解码编码的数据
    CharBuffer charBuffer = CharBuffer.allocate(1024);
    charBuffer.put("字符集编码解码");
    charBuffer.flip();
    //4.编码
    ByteBuffer byteBuffer = charsetEncoder.encode(charBuffer);
    System.out.println("编码后:");
    for (int i = 0; i < byteBuffer.limit(); i++) {
        System.out.println(byteBuffer.get());
    }
    //5.解码
    byteBuffer.flip();
    CharBuffer charBuffer1 = charsetDecoder.decode(byteBuffer);
    System.out.println("解码后:");
    System.out.println(charBuffer1.toString());
    System.out.println("指定其他格式解码:");
    Charset charset1 = Charset.forName("GBK");
    byteBuffer.flip();
    CharBuffer charBuffer2 = charset1.decode(byteBuffer);
    System.out.println(charBuffer2.toString());
    //6.获取 Charset 所支持的字符编码
    Map<String, Charset> map = Charset.availableCharsets();
    map.forEach((k,v)->{
        System.out.println(k+ v);
    });
}