搭建K8s
1. 专有网络VPC
专有网络VPC(Virtual Private Cloud)专有的云上私有网络,允许用户在公共云上配置和管理一个逻辑隔离的网络区域。每个VPC至少由三部分组成:私网网段、交换机和路由表: 交换机:通过创建交换机为专有网络划分一个或多个子网。同一专有网络内的不同交换机之间内网互通。
另外可以创建多个VPC来实现网络隔离不同环境,比如开发测试和生产,来实现ip不变,减少部署的复杂度: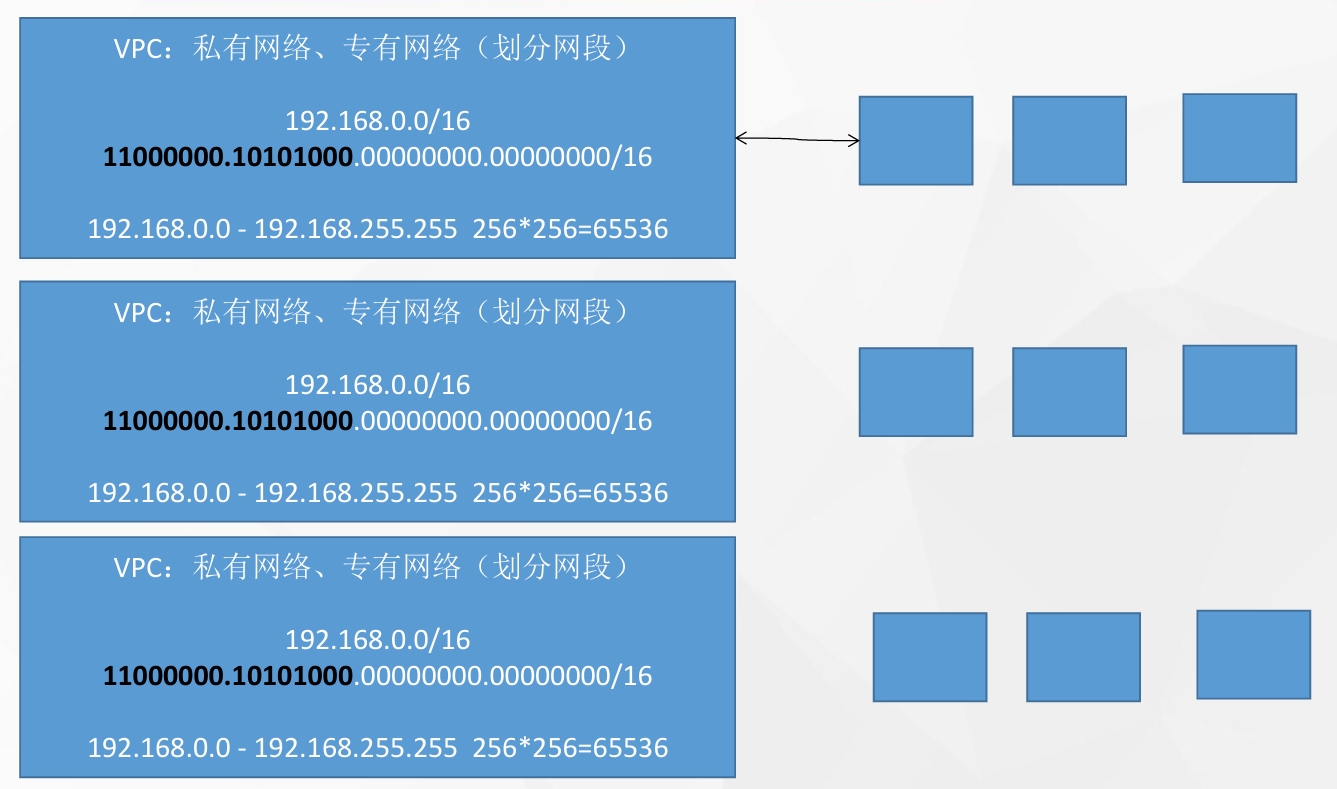
1.1 创建VPC
首先在购买云主机页面查看当前推荐云主机的区域: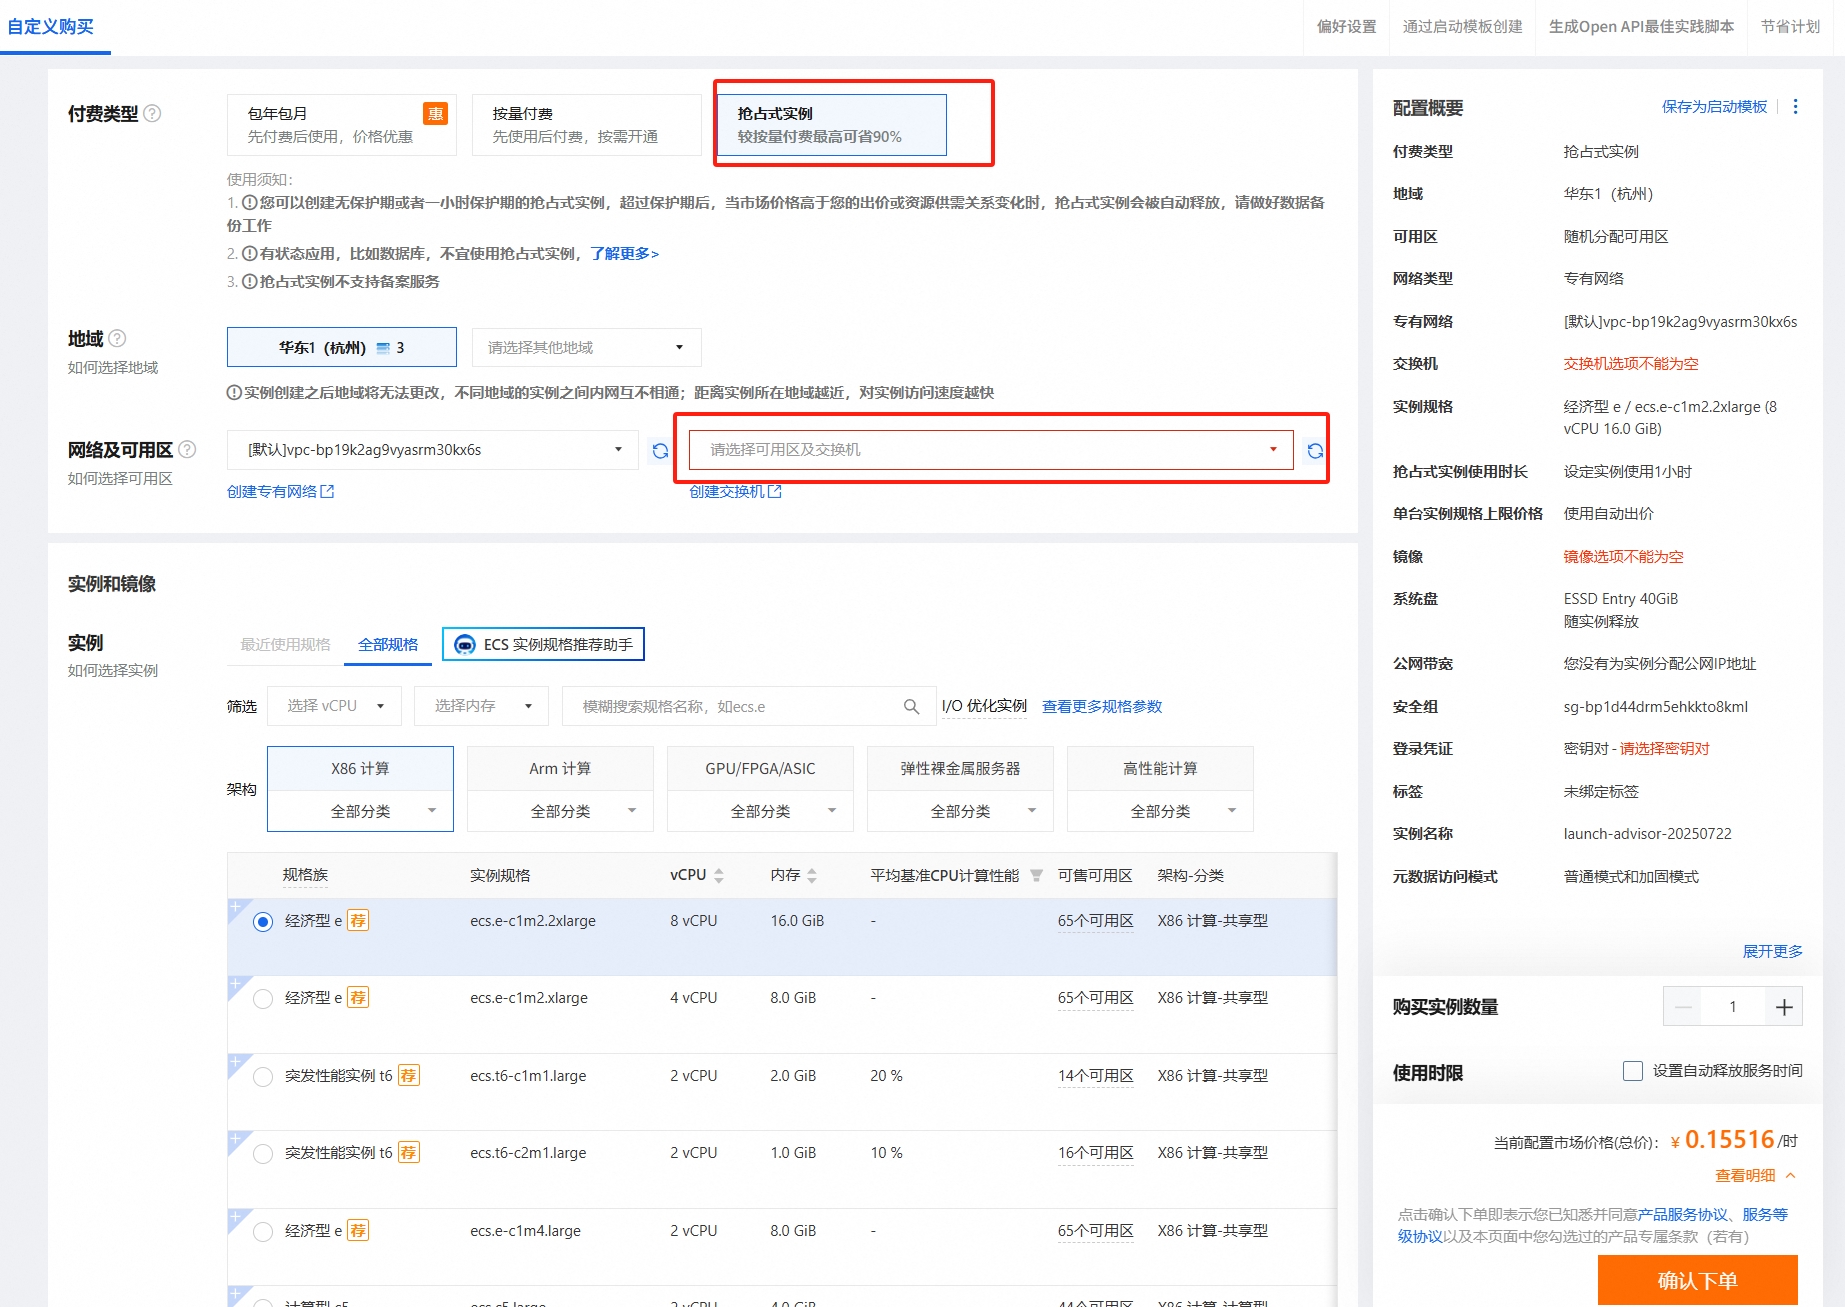 可以看到推荐使用华东1-杭州区域的云主机。接着选择产品中的专有网络,点击创建专有网络:
 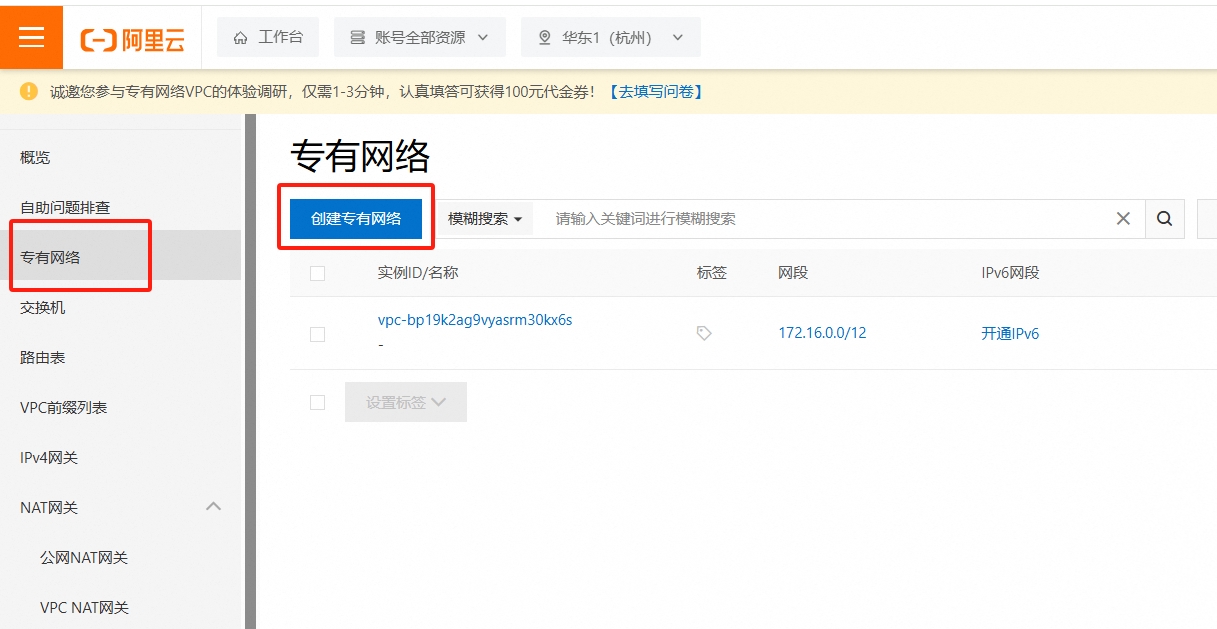 千万不要选择192.168.0.0/16或者192.168开头的网络范围,避免和k8s管理的网段冲突。
 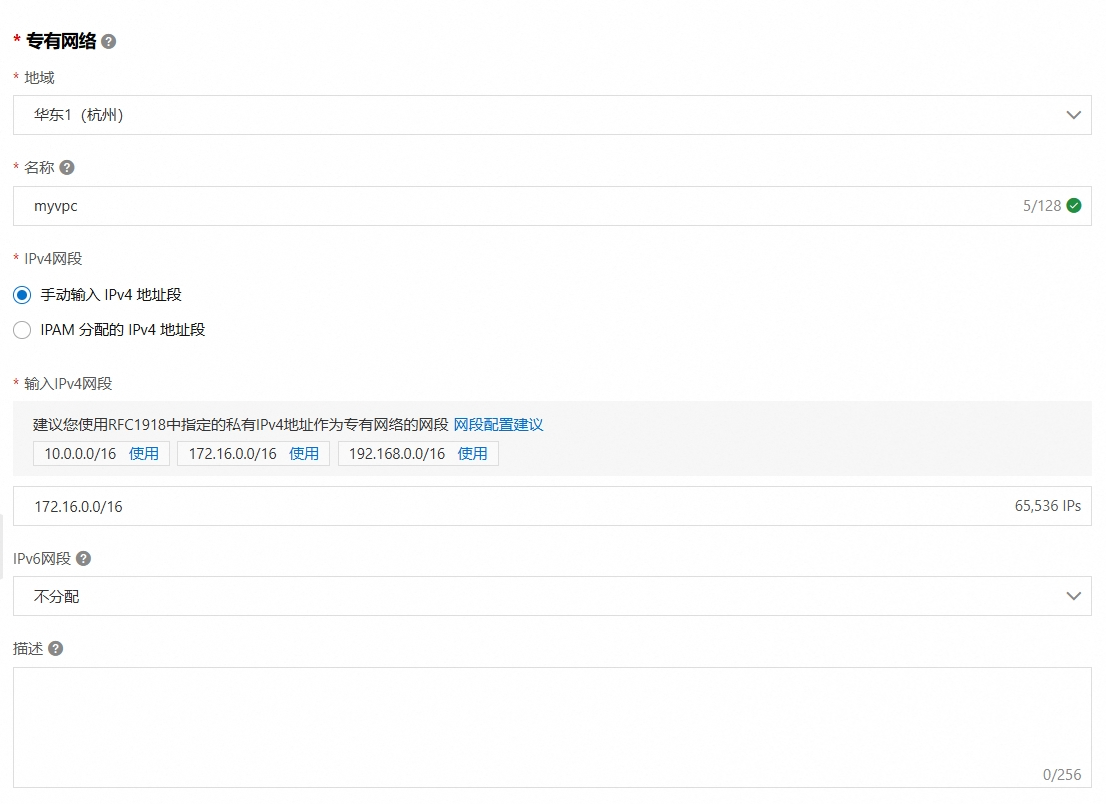 比如我选择的是172.16.0.0/16网段,接着配置交换机:
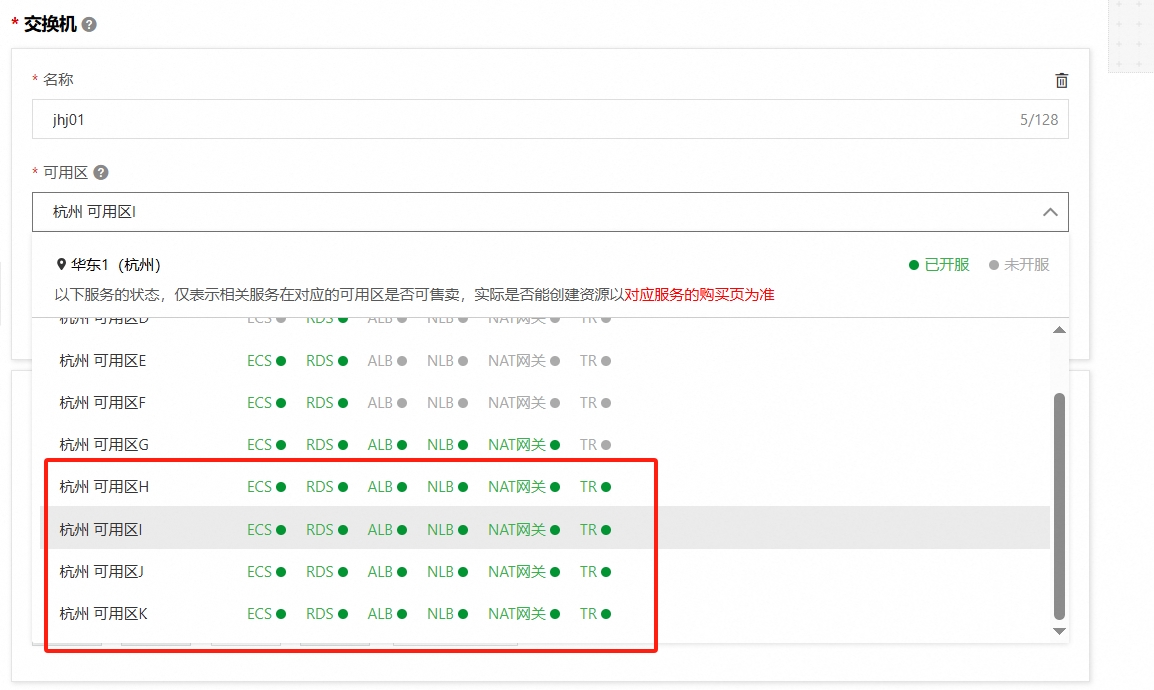
 可以在右侧观察当前网络拓扑图:
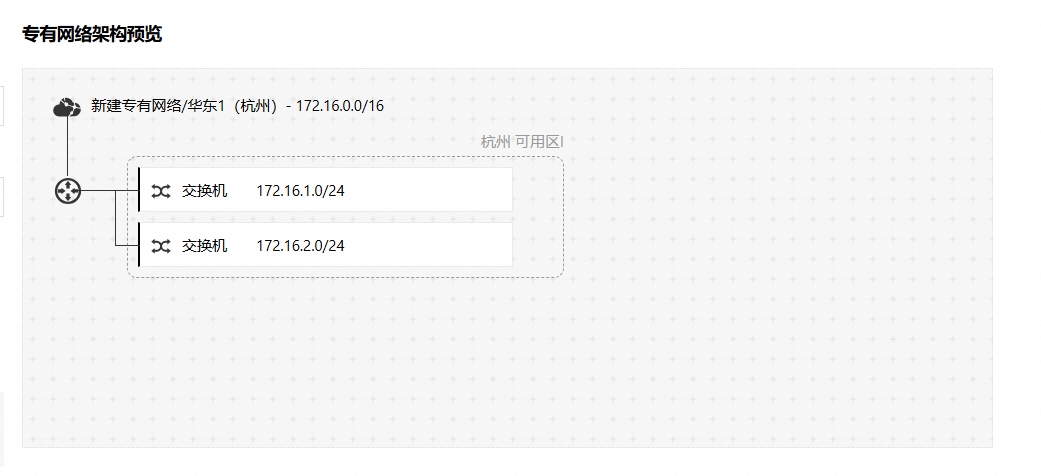
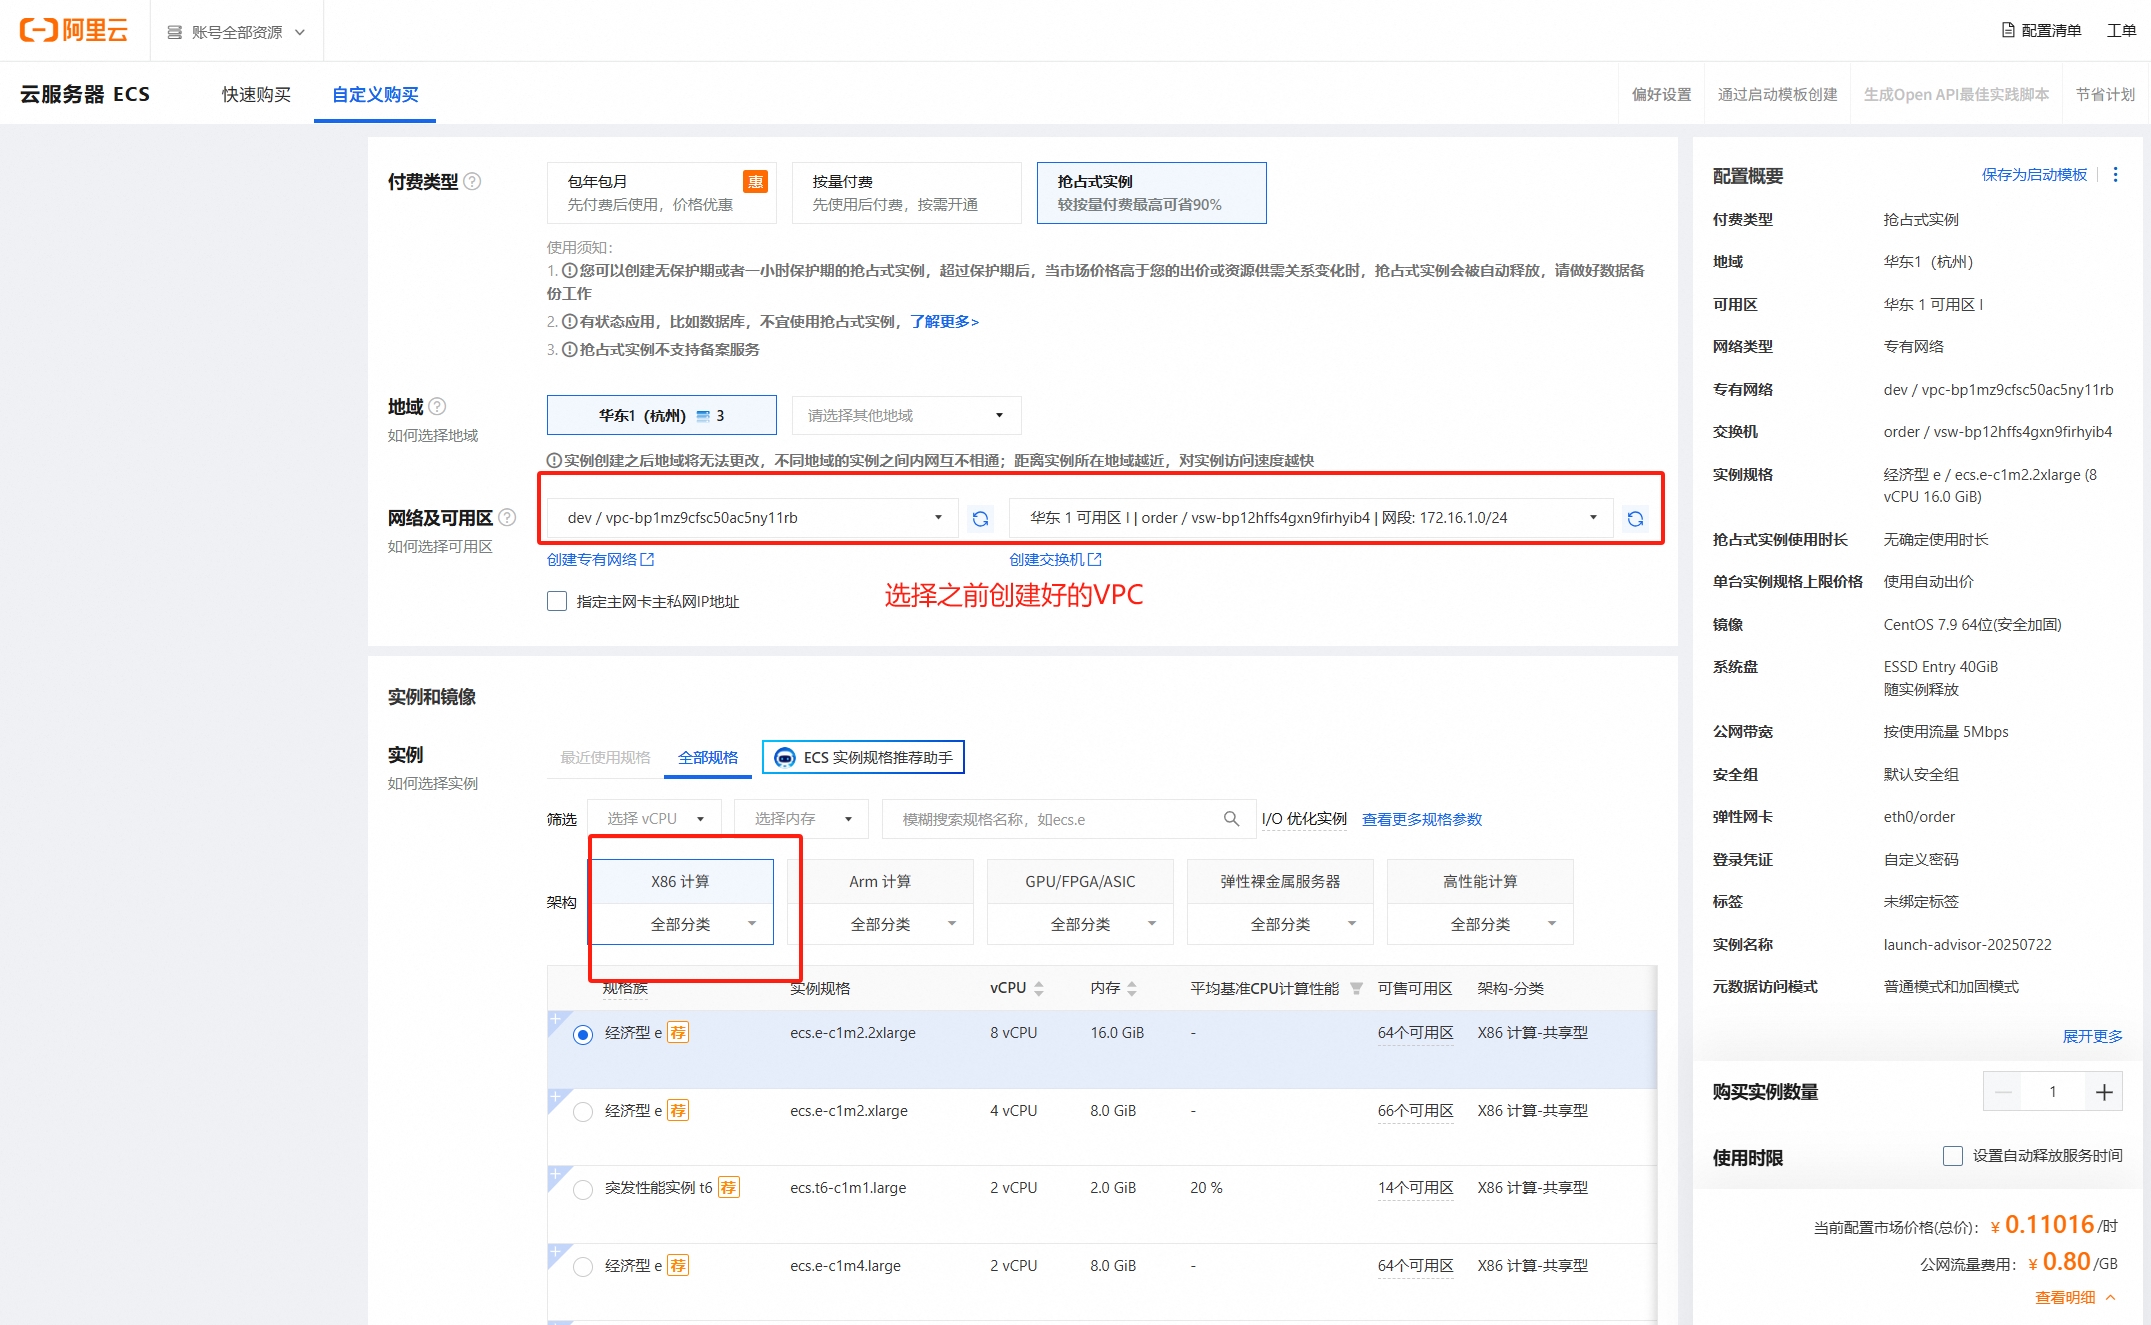
2. 购买云主机
- 选择抢占式实例更加划算, 然后选择之前配置的VPC:
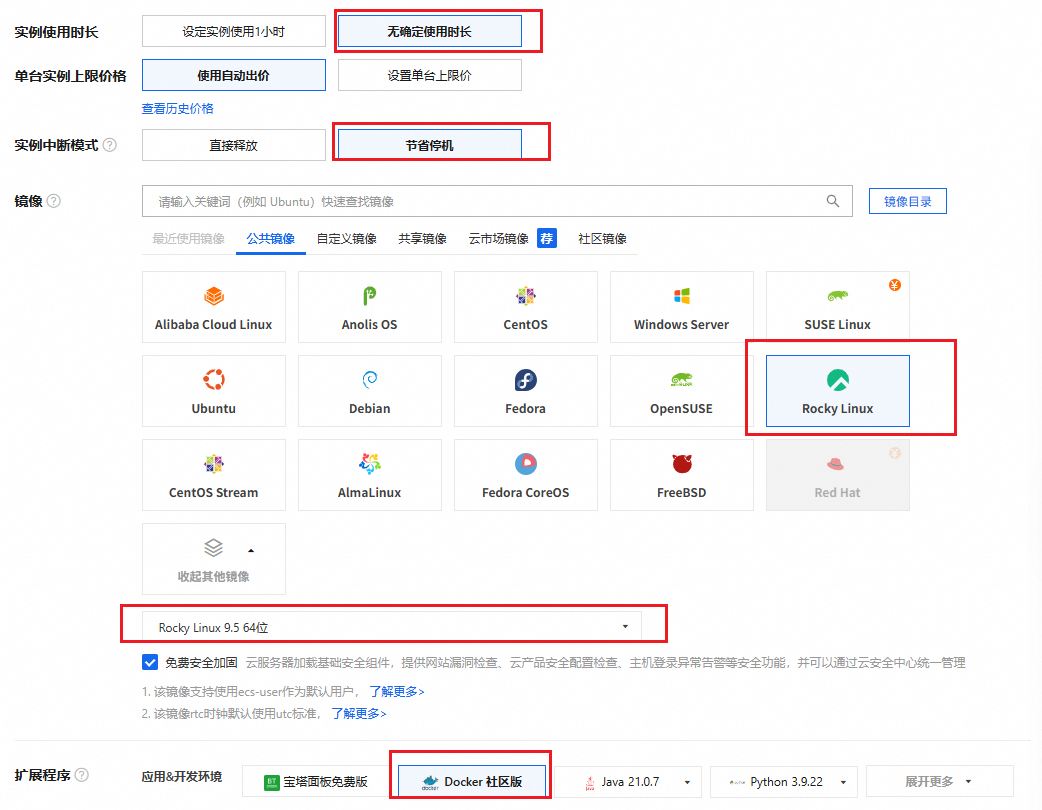
- 系统镜像选择rocky linux最新版本v9.5版本(内核版本为5.14),不要选择centos7.9版本(内核版本为3.10),k8s推荐使用内核5.8+:
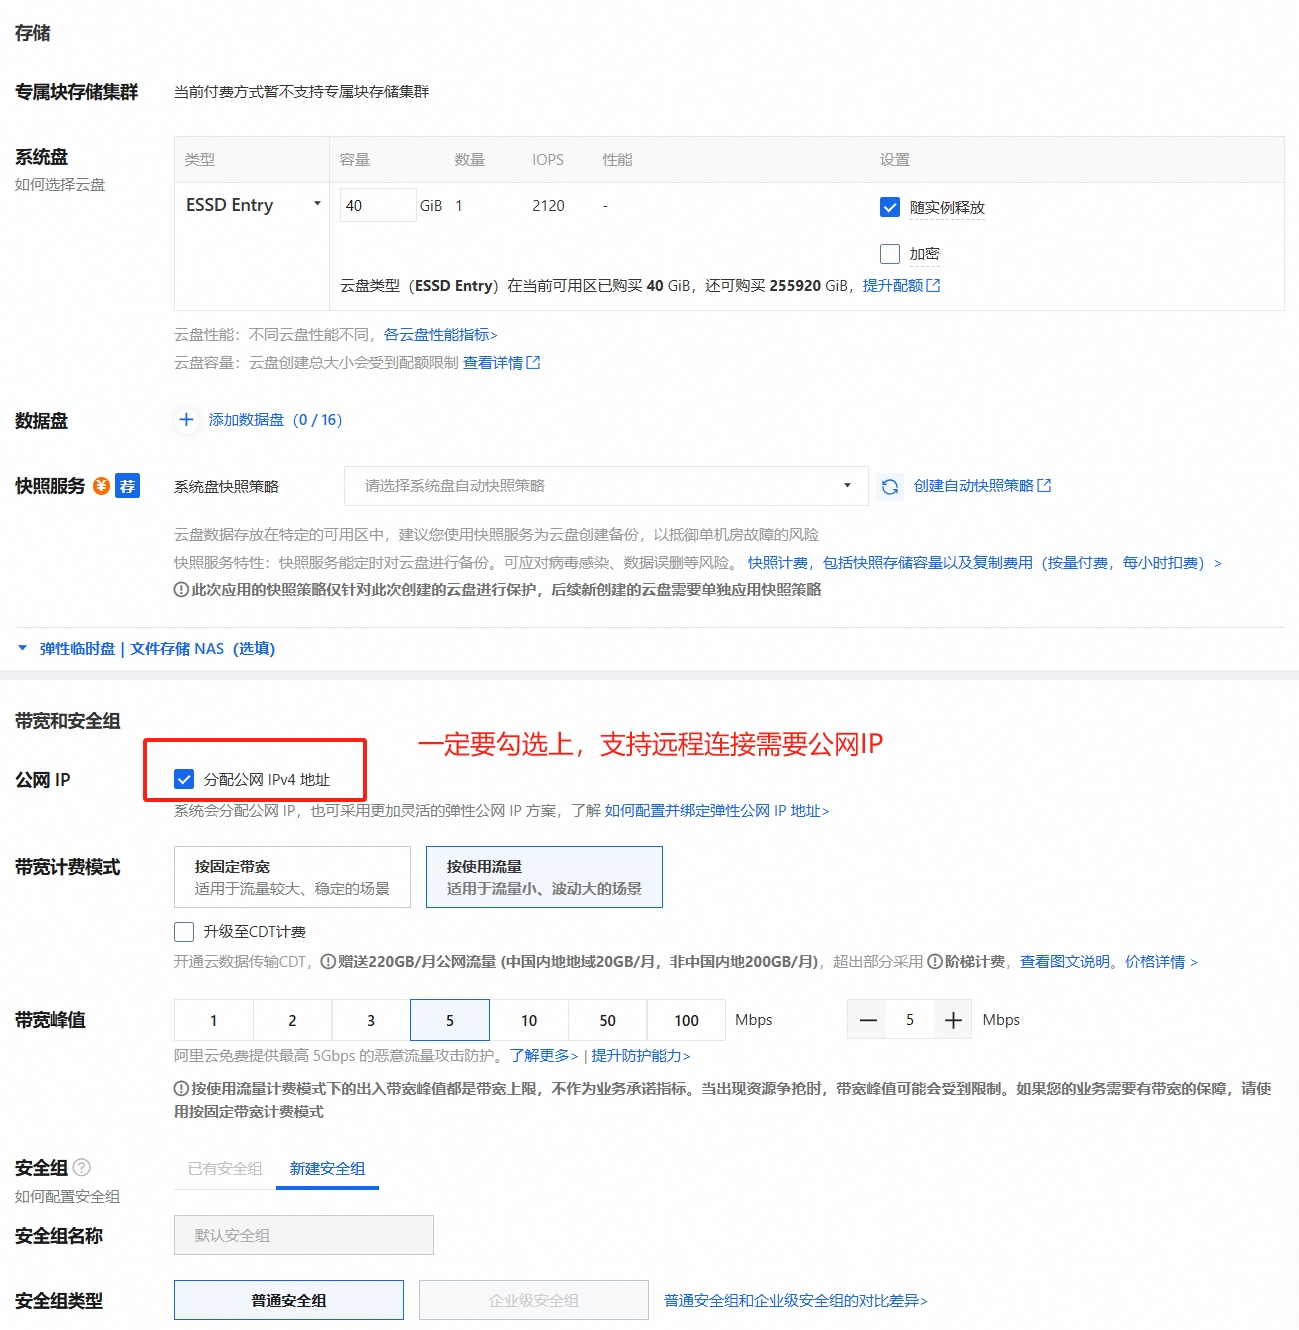
- 勾选分配公网IP:
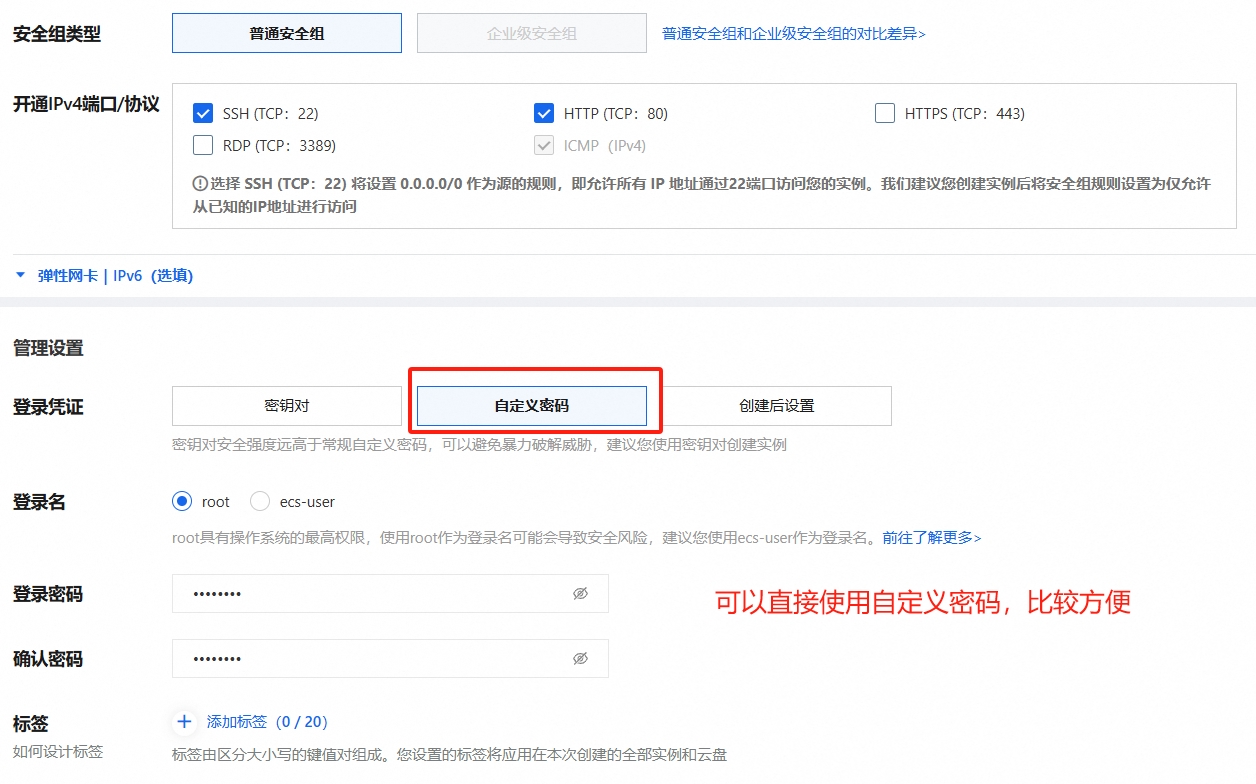
- 配置root账户密码:
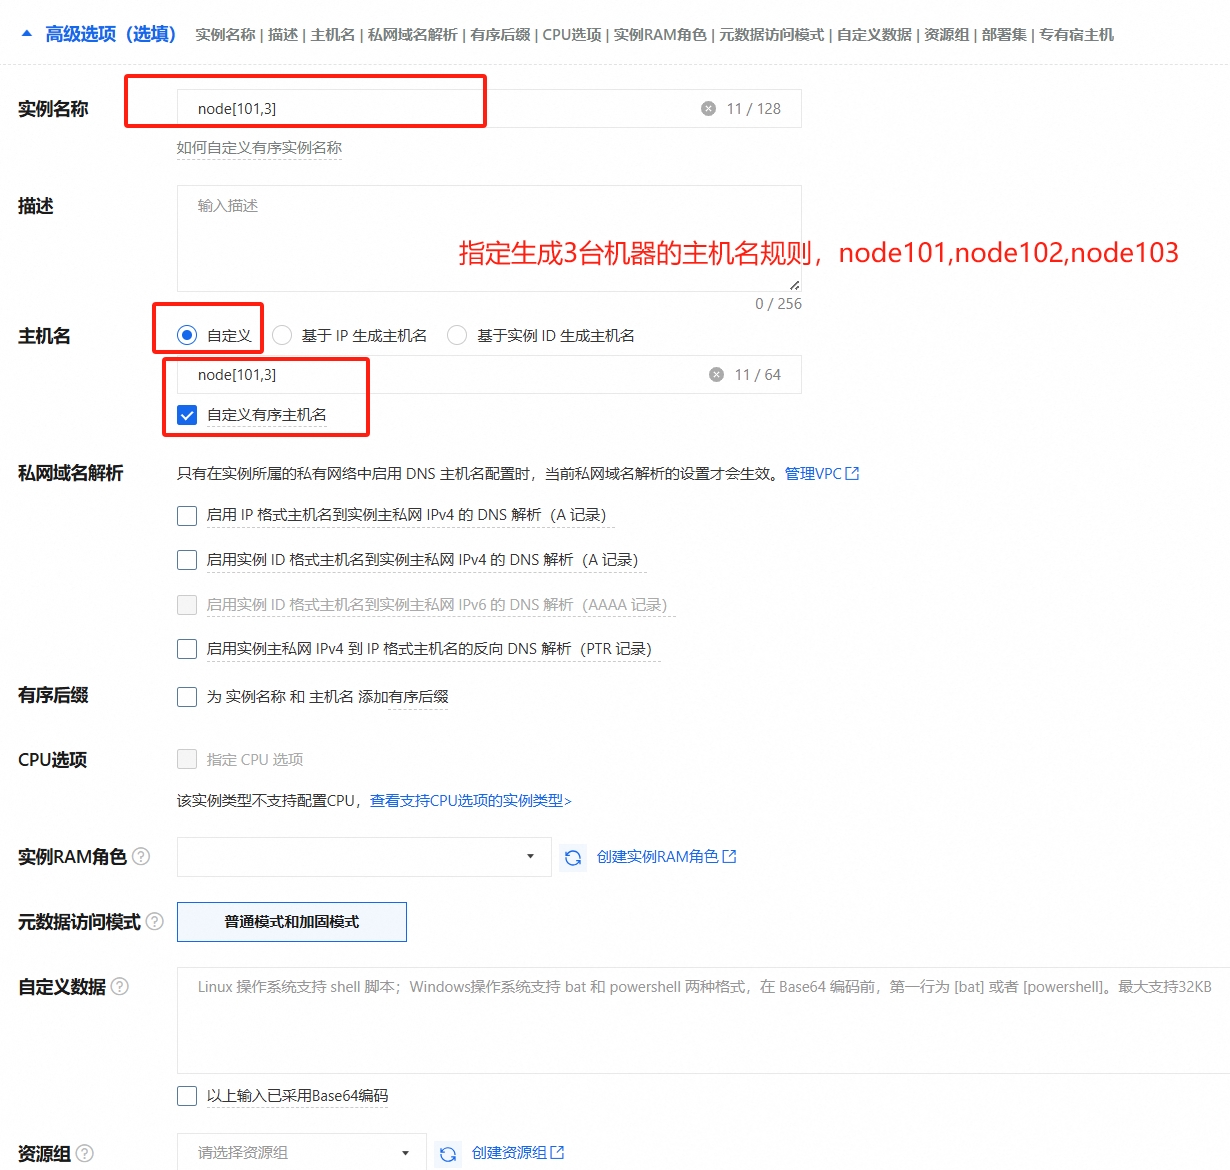
- 设置主机名:
3. 集群规划
3. 环境准备
3.1 预装Docker
3台机器都事先安装Docker。
3.2 关闭交换分区
# 可以通过free -m查看swap分区
[root@node102 ~]# free -m
              total        used        free      shared  buff/cache   available
Mem:          15362         361       14525           0         475       14742
Swap: 0 0 0若Swap一栏都是0 0 0表示已经关闭了swap,反之需要关闭:
[root@node101 ~]# swapoff -a
[root@node101 ~]# sed -ri 's/.*swap.*/#&/' /etc/fstab3.3 禁用SeLinux
[root@node101 ~]# setenforce 0
[root@node101 ~]# sed -i 's/^SELINUX=enforcing$/SELINUX=permissive/' /etc/selinux/config3.4 允许iptables检查桥接流量
cat <<EOF | sudo tee /etc/modules-load.d/k8s.conf
br_netfilter
EOF

cat <<EOF | sudo tee /etc/sysctl.d/k8s.conf
net.bridge.bridge-nf-call-ip6tables = 1
net.bridge.bridge-nf-call-iptables = 1
EOF
sudo sysctl --systemipv6可能也会被用到,将ipv6的流量都放到ipv4里面,统计流量更加方便准确。
4. 安装kubeadm、kubelet和kubectl
在每台机器上安装以下的软件包:
- kubeadm:用来初始化集群的指令,使用
kubeadm join加入节点。 - kubelet:在集群中的每个节点上用来启动Pod和容器等。
- kubectl:用来与集群通信的命令行工具。
4.1 添加k8s的yum仓库
cat <<EOF | sudo tee /etc/yum.repos.d/kubernetes.repo
[kubernetes]
name=Kubernetes
baseurl=https://pkgs.k8s.io/core:/stable:/v1.33/rpm/
enabled=1
gpgcheck=1
gpgkey=https://pkgs.k8s.io/core:/stable:/v1.33/rpm/repodata/repomd.xml.key
exclude=kubelet kubeadm kubectl cri-tools kubernetes-cni
EOF4.2 执行在线安装
在三台机器上执行:
yum install -y kubelet kubeadm kubectl --disableexcludes=kubernetes
## --now表示现在启动
systemctl enable --now kubeletkubelet现在每隔几秒就会重启,因为它陷入了一个等待kubeadm指令的死循环。
5. 配置Containerd
在新版的K8s中,K8s单独去调用containerd创建容器而不是通过docker间接调用,K8s调用链如下: CRI-->containerd-->circtl
5.1 配置config.toml
在三台机器上执行:
[root@node101 ~]# cat /etc/containerd/config.toml | wc -l
31
[root@node101 ~]# containerd config default > /etc/containerd/config.toml
[root@node101 ~]# cat /etc/containerd/config.toml | wc -l
2895.2 配置加速器
## 默认拉取国外官网的镜像
[root@node101 ~]# grep sandbox_image /etc/containerd/config.toml
    sandbox_image = "registry.k8s.io/pause:3.8"
[root@node101 ~]# sed -i "s#registry.k8s.io/pause#registry.aliyuncs.com/google_containers/pause#g" /etc/containerd/config.toml
[root@node101 ~]# sed -i "s#k8s.gcr.io/pause#registry.aliyuncs.com/google_containers/pause#g" /etc/containerd/config.toml5.3 配置cgroup驱动程序
sed -i "s#SystemdCgroup = false#SystemdCgroup = true#g" /etc/containerd/config.toml5.4 配置dockerhub镜像加速
编辑/etc/containerd/config.toml文件:
## 找到第161行配置config_path
[plugins."io.containerd.grpc.v1.cri".registry]
  config_path = "/etc/containerd/certs.d"

  [plugins."io.containerd.grpc.v1.cri".registry.auths]

[plugins."io.containerd.grpc.v1.cri".registry.configs]创建对应的目录:
[root@node101 ~]# mkdir -p /etc/containerd/certs.d/docker.io配置镜像加速源:
cat > /etc/containerd/certs.d/docker.io/hosts.toml <<EOF
server = "https://docker.io"
[host."https://ms9glx6x.mirror.aliyuncs.com"]
    capabilities = ["pull", "resolve"]
[host."https://docker.mirrors.ustc.edu.cn"]
    capabilities = ["pull", "resolve"]
[host."https://docker.nju.edu.cn"]
    capabilities = ["pull", "resolve","push"]
EOF5.5 配置master主机名
- master节点执行
# 所有机器添加master域名映射,以下需要修改为自己的
echo "172.17.218.217 cluster-endpoint" >> /etc/hosts需要注意的是172.17.218.217是master的ip地址,需要和docker内部使用的ip区分开,可以使用ip a命令查看docker网卡使用ip网段: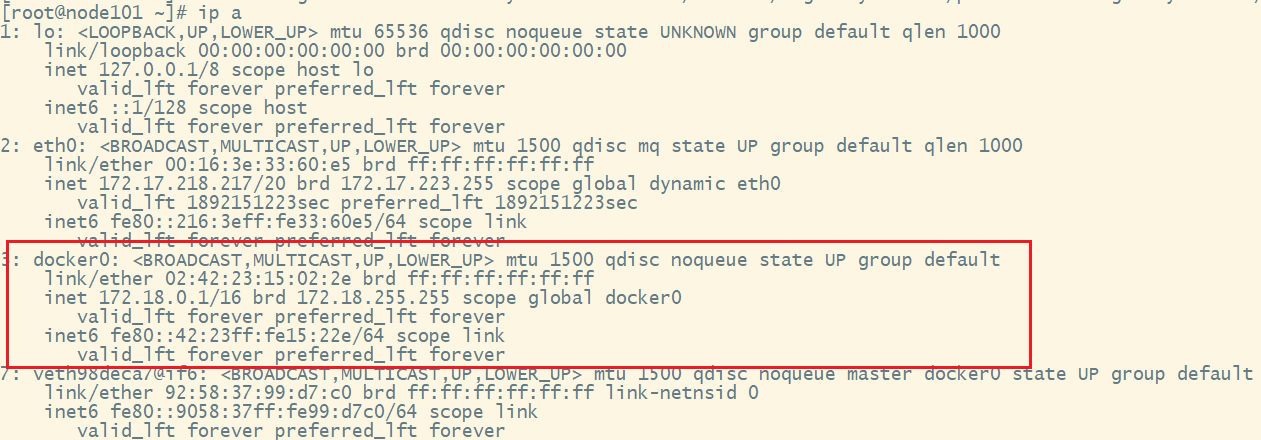
6. 初始化kubeadm配置文件
6.1 生成模板配置文件
[root@node101 ~]# kubeadm config print init-defaults > kubeadm.yaml6.2 修改kubeadm.yaml
[root@node101 ~]# vim kubeadm.yaml
## 修改localAPIEndpoint节点下的advertiseAddress:
advertiseAddress: 172.17.218.217
## 修改imageRepository
imageRepository: registry.aliyuncs.com/google_containers
## nodeRegistration节点下修改name:
name: cluster-endpoint
## 在networking节点下添加:
podSubnet: 192.168.0.0/16需要注意的是serviceSubnet、podSubnet和机器的ip地址不重叠。
6.3 手工下载镜像
除了kubelet\kubeadm\kubectl, 其他k8s组件都是由镜像组成,搭建k8s集群需要提前准备好这些组件。
## 查看要下载的镜像列表
[root@node101 ~]# kubeadm config images list --config kubeadm.yaml
registry.aliyuncs.com/google_containers/kube-apiserver:v1.33.0
registry.aliyuncs.com/google_containers/kube-controller-manager:v1.33.0
registry.aliyuncs.com/google_containers/kube-scheduler:v1.33.0
registry.aliyuncs.com/google_containers/kube-proxy:v1.33.0
registry.aliyuncs.com/google_containers/coredns:v1.12.0
registry.aliyuncs.com/google_containers/pause:3.10
registry.aliyuncs.com/google_containers/etcd:3.5.21-0
## 下载镜像
[root@node101 ~]# kubeadm config images pull --config kubeadm.yaml
[config/images] Pulled registry.aliyuncs.com/google_containers/kube-apiserver:v1.33.0
[config/images] Pulled registry.aliyuncs.com/google_containers/kube-controller-manager:v1.33.0
[config/images] Pulled registry.aliyuncs.com/google_containers/kube-scheduler:v1.33.0
[config/images] Pulled registry.aliyuncs.com/google_containers/kube-proxy:v1.33.0
[config/images] Pulled registry.aliyuncs.com/google_containers/coredns:v1.12.0
[config/images] Pulled registry.aliyuncs.com/google_containers/pause:3.10
[config/images] Pulled registry.aliyuncs.com/google_containers/etcd:3.5.21-07. 初始化主节点
执行init命令:
[root@node101 ~]# kubeadm init --config kubeadm.yaml
[init] Using Kubernetes version: v1.33.0
[preflight] Running pre-flight checks
[preflight] Pulling images required for setting up a Kubernetes cluster
[preflight] This might take a minute or two, depending on the speed of your internet connection
[preflight] You can also perform this action beforehand using 'kubeadm config images pull'
W0730 07:54:07.245627   41560 checks.go:846] detected that the sandbox image "registry.aliyuncs.com/google_containers/pause:3.8" of the container runtime is inconsistent with that used by kubeadm.It is recommended to use "registry.aliyuncs.com/google_containers/pause:3.10" as the CRI sandbox image.
[certs] Using certificateDir folder "/etc/kubernetes/pki"
[certs] Generating "ca" certificate and key
[certs] Generating "apiserver" certificate and key
[certs] apiserver serving cert is signed for DNS names [cluster-endpoint kubernetes kubernetes.default kubernetes.default.svc kubernetes.default.svc.cluster.local] and IPs [10.96.0.1 172.17.218.217]
[certs] Generating "apiserver-kubelet-client" certificate and key
[certs] Generating "front-proxy-ca" certificate and key
[certs] Generating "front-proxy-client" certificate and key
[certs] Generating "etcd/ca" certificate and key
[certs] Generating "etcd/server" certificate and key
[certs] etcd/server serving cert is signed for DNS names [cluster-endpoint localhost] and IPs [172.17.218.217 127.0.0.1 ::1]
[certs] Generating "etcd/peer" certificate and key
[certs] etcd/peer serving cert is signed for DNS names [cluster-endpoint localhost] and IPs [172.17.218.217 127.0.0.1 ::1]
[certs] Generating "etcd/healthcheck-client" certificate and key
[certs] Generating "apiserver-etcd-client" certificate and key
[certs] Generating "sa" key and public key
[kubeconfig] Using kubeconfig folder "/etc/kubernetes"
[kubeconfig] Writing "admin.conf" kubeconfig file
[kubeconfig] Writing "super-admin.conf" kubeconfig file
[kubeconfig] Writing "kubelet.conf" kubeconfig file
[kubeconfig] Writing "controller-manager.conf" kubeconfig file
[kubeconfig] Writing "scheduler.conf" kubeconfig file
[etcd] Creating static Pod manifest for local etcd in "/etc/kubernetes/manifests"
[control-plane] Using manifest folder "/etc/kubernetes/manifests"
[control-plane] Creating static Pod manifest for "kube-apiserver"
[control-plane] Creating static Pod manifest for "kube-controller-manager"
[control-plane] Creating static Pod manifest for "kube-scheduler"
[kubelet-start] Writing kubelet environment file with flags to file "/var/lib/kubelet/kubeadm-flags.env"
[kubelet-start] Writing kubelet configuration to file "/var/lib/kubelet/config.yaml"
[kubelet-start] Starting the kubelet
[wait-control-plane] Waiting for the kubelet to boot up the control plane as static Pods from directory "/etc/kubernetes/manifests"
[kubelet-check] Waiting for a healthy kubelet at http://127.0.0.1:10248/healthz. This can take up to 4m0s
[kubelet-check] The kubelet is healthy after 501.534607ms
[control-plane-check] Waiting for healthy control plane components. This can take up to 4m0s
[control-plane-check] Checking kube-apiserver at https://172.17.218.217:6443/livez
[control-plane-check] Checking kube-controller-manager at https://127.0.0.1:10257/healthz
[control-plane-check] Checking kube-scheduler at https://127.0.0.1:10259/livez
[control-plane-check] kube-controller-manager is healthy after 1.505777967s
[control-plane-check] kube-scheduler is healthy after 2.588974767s
[control-plane-check] kube-apiserver is healthy after 4.502039406s
[upload-config] Storing the configuration used in ConfigMap "kubeadm-config" in the "kube-system" Namespace
[kubelet] Creating a ConfigMap "kubelet-config" in namespace kube-system with the configuration for the kubelets in the cluster
[upload-certs] Skipping phase. Please see --upload-certs
[mark-control-plane] Marking the node cluster-endpoint as control-plane by adding the labels: [node-role.kubernetes.io/control-plane node.kubernetes.io/exclude-from-external-load-balancers]
[mark-control-plane] Marking the node cluster-endpoint as control-plane by adding the taints [node-role.kubernetes.io/control-plane:NoSchedule]
[bootstrap-token] Using token: abcdef.0123456789abcdef
[bootstrap-token] Configuring bootstrap tokens, cluster-info ConfigMap, RBAC Roles
[bootstrap-token] Configured RBAC rules to allow Node Bootstrap tokens to get nodes
[bootstrap-token] Configured RBAC rules to allow Node Bootstrap tokens to post CSRs in order for nodes to get long term certificate credentials
[bootstrap-token] Configured RBAC rules to allow the csrapprover controller automatically approve CSRs from a Node Bootstrap Token
[bootstrap-token] Configured RBAC rules to allow certificate rotation for all node client certificates in the cluster
[bootstrap-token] Creating the "cluster-info" ConfigMap in the "kube-public" namespace
[kubelet-finalize] Updating "/etc/kubernetes/kubelet.conf" to point to a rotatable kubelet client certificate and key
[addons] Applied essential addon: CoreDNS
[addons] Applied essential addon: kube-proxy

Your Kubernetes control-plane has initialized successfully!

To start using your cluster, you need to run the following as a regular user:

  mkdir -p $HOME/.kube
  sudo cp -i /etc/kubernetes/admin.conf $HOME/.kube/config
  sudo chown $(id -u):$(id -g) $HOME/.kube/config

Alternatively, if you are the root user, you can run:

  export KUBECONFIG=/etc/kubernetes/admin.conf

You should now deploy a pod network to the cluster.
Run "kubectl apply -f [podnetwork].yaml" with one of the options listed at:
  https://kubernetes.io/docs/concepts/cluster-administration/addons/

Then you can join any number of worker nodes by running the following on each as root:

kubeadm join 172.17.218.217:6443 --token abcdef.0123456789abcdef \
--discovery-token-ca-cert-hash sha256:6ac98b29f9a0ef7bcd0db0f16685671e33d619900a873f0f347e5a2f93559d10可以看到控制平面已经初始化成功,查看当前运行的镜像:
## 类似docker命令docker ps
[root@node101 ~]# crictl ps
WARN[0000] Config "/etc/crictl.yaml" does not exist, trying next: "/usr/bin/crictl.yaml"
WARN[0000] runtime connect using default endpoints: [unix:///run/containerd/containerd.sock unix:///run/crio/crio.sock unix:///var/run/cri-dockerd.sock]. As the default settings are now deprecated, you should set the endpoint instead.
WARN[0000] Image connect using default endpoints: [unix:///run/containerd/containerd.sock unix:///run/crio/crio.sock unix:///var/run/cri-dockerd.sock]. As the default settings are now deprecated, you should set the endpoint instead.
CONTAINER           IMAGE               CREATED             STATE               NAME                      ATTEMPT             POD ID              POD                                        NAMESPACE
77d0bad26ec66       f1184a0bd7fe5       6 minutes ago       Running             kube-proxy                0                   eb827b797bb27       kube-proxy-xcg9l                           kube-system
b8241f43631dd       6ba9545b2183e       6 minutes ago       Running             kube-apiserver            0                   e59720cfe3cc1       kube-apiserver-cluster-endpoint            kube-system
17a973739cc6a       8d72586a76469       6 minutes ago       Running             kube-scheduler            0                   43b05c5c4441d       kube-scheduler-cluster-endpoint            kube-system
b492b4b7aec6f       1d579cb6d6967       6 minutes ago       Running             kube-controller-manager   0                   a459ea4106d84       kube-controller-manager-cluster-endpoint   kube-system
4f8d8339823dd 499038711c081 6 minutes ago Running etcd 0 82e999aaf16cd etcd-cluster-endpoint kube-system按照控制台日志执行后续提示信息进行操作:
[root@node101 ~]# mkdir -p $HOME/.kube
[root@node101 ~]# sudo cp -i /etc/kubernetes/admin.conf $HOME/.kube/config
[root@node101 ~]# sudo chown $(id -u):$(id -g) $HOME/.kube/config
[root@node101 ~]# cat /etc/kubernetes/admin.conf8. 安装扩展
查看当前k8s节点情况:
[root@node101 ~]# kubectl get nodes
NAME               STATUS     ROLES           AGE   VERSION
cluster-endpoint NotReady control-plane 15h v1.33.3可以发现cluster-endpoint的状态是NotReady,并且只有master节点,这是因为还没有安装网络扩展,网络打通后就可以把这些节点串联起来。
8.1 添加网络扩展
在K8s集群中,网络插件负责管理Pod之间的网络通信。常见的网络插件包括Flannel、Calico和Weave Net, 推荐使用Calico,Calico提供了高级的网络策略支持和更强的网络安全性,是生产环境中常见的选择。
[root@node101 ~]# curl https://calico-v3-25.netlify.app/archive/v3.25/manifests/calico.yaml  -O
## 修改calico.yaml中的镜像地址:
## 第4443行 image地址改为
image: swr.cn-north-4.myhuaweicloud.com/ddn-k8s/docker.io/calico/cni:v3.25.0
## 第4471行 image地址改为
image: swr.cn-north-4.myhuaweicloud.com/ddn-k8s/docker.io/calico/cni:v3.25.0
## 第4514行 image地址改为
image: swr.cn-north-4.myhuaweicloud.com/ddn-k8s/docker.io/calico/node:v3.25.0
## 第4540行 image地址改为
image: swr.cn-north-4.myhuaweicloud.com/ddn-k8s/docker.io/calico/node:v3.25.0
## 第4757行 image地址改为
image: swr.cn-north-4.myhuaweicloud.com/ddn-k8s/docker.io/calico/kube-controllers:v3.25.0
## pod子网默认是192.168.0.0/16,如果要修改需要取消注释CALICO_IPV4POOL_CIDR相关的value
[root@node101 ~]# kubectl apply -f calico.yaml
poddisruptionbudget.policy/calico-kube-controllers created
serviceaccount/calico-kube-controllers created
serviceaccount/calico-node created
configmap/calico-config created
customresourcedefinition.apiextensions.k8s.io/bgpconfigurations.crd.projectcalico.org created
customresourcedefinition.apiextensions.k8s.io/bgppeers.crd.projectcalico.org created
customresourcedefinition.apiextensions.k8s.io/blockaffinities.crd.projectcalico.org created
customresourcedefinition.apiextensions.k8s.io/caliconodestatuses.crd.projectcalico.org created
customresourcedefinition.apiextensions.k8s.io/clusterinformations.crd.projectcalico.org created
customresourcedefinition.apiextensions.k8s.io/felixconfigurations.crd.projectcalico.org created
customresourcedefinition.apiextensions.k8s.io/globalnetworkpolicies.crd.projectcalico.org created
customresourcedefinition.apiextensions.k8s.io/globalnetworksets.crd.projectcalico.org created
customresourcedefinition.apiextensions.k8s.io/hostendpoints.crd.projectcalico.org created
customresourcedefinition.apiextensions.k8s.io/ipamblocks.crd.projectcalico.org created
customresourcedefinition.apiextensions.k8s.io/ipamconfigs.crd.projectcalico.org created
customresourcedefinition.apiextensions.k8s.io/ipamhandles.crd.projectcalico.org created
customresourcedefinition.apiextensions.k8s.io/ippools.crd.projectcalico.org created
customresourcedefinition.apiextensions.k8s.io/ipreservations.crd.projectcalico.org created
customresourcedefinition.apiextensions.k8s.io/kubecontrollersconfigurations.crd.projectcalico.org created
customresourcedefinition.apiextensions.k8s.io/networkpolicies.crd.projectcalico.org created
customresourcedefinition.apiextensions.k8s.io/networksets.crd.projectcalico.org created
clusterrole.rbac.authorization.k8s.io/calico-kube-controllers created
clusterrole.rbac.authorization.k8s.io/calico-node created
clusterrolebinding.rbac.authorization.k8s.io/calico-kube-controllers created
clusterrolebinding.rbac.authorization.k8s.io/calico-node created
daemonset.apps/calico-node created
deployment.apps/calico-kube-controllers created8.2 查看网络组件
[root@node101 ~]# kubectl get pod -A
NAMESPACE     NAME                                       READY   STATUS    RESTARTS      AGE
kube-system   calico-kube-controllers-6b7cfc4d75-4hht8   1/1     Running   0             64m
kube-system   calico-node-f99xn                          1/1     Running   0             64m
kube-system   coredns-757cc6c8f8-2m6tc                   1/1     Running   0             40h
kube-system   coredns-757cc6c8f8-68qkx                   1/1     Running   0             40h
kube-system   etcd-cluster-endpoint                      1/1     Running   1 (27h ago)   40h
kube-system   kube-apiserver-cluster-endpoint            1/1     Running   1 (27h ago)   40h
kube-system   kube-controller-manager-cluster-endpoint   1/1     Running   1 (27h ago)   40h
kube-system   kube-proxy-xcg9l                           1/1     Running   1 (27h ago)   40h
kube-system   kube-scheduler-cluster-endpoint            1/1     Running   1 (27h ago)   40h
## 显示节点角色
[root@node101 ~]# kubectl get nodes
NAME               STATUS   ROLES           AGE   VERSION
cluster-endpoint Ready control-plane 47h v1.33.3在k8s版本在v1.18之前,控制平面节点的角色标签为master,之后都是角色名称更改为control-plane。
8.3 添加工作节点
在node102\node103上面执行:
## token默认是24小时有效
kubeadm join 172.17.218.217:6443 --token abcdef.0123456789abcdef --discovery-token-ca-cert-hash sha256:6ac98b29f9a0ef7bcd0db0f16685671e33d619900a873f0f347e5a2f93559d10
## 如果过期 需要重新生成token
[root@node101 ~]# kubeadm token create --print-join-command
kubeadm join 172.17.218.217:6443 --token tervwg.n7t5t3kzz8ool1ki --discovery-token-ca-cert-hash sha256:6ac98b29f9a0ef7bcd0db0f16685671e33d619900a873f0f347e5a2f93559d10在执行过程中若出现报错,可以多试几次:
[root@node103 ~]# kubeadm join 172.17.218.217:6443 --token tervwg.n7t5t3kzz8ool1ki --discovery-token-ca-cert-hash sha256:6ac98b29f9a0ef7bcd0db0f16685671e33d619900a873f0f347e5a2f93559d10
[preflight] Running pre-flight checks
error execution phase preflight: [preflight] Some fatal errors occurred:
        [ERROR FileAvailable--etc-kubernetes-kubelet.conf]: /etc/kubernetes/kubelet.conf already exists
        [ERROR FileAvailable--etc-kubernetes-pki-ca.crt]: /etc/kubernetes/pki/ca.crt already exists
[preflight] If you know what you are doing, you can make a check non-fatal with `--ignore-preflight-errors=...`
To see the stack trace of this error execute with --v=5 or higher
[root@node103 ~]# cd  /etc/kubernetes
[root@node103 kubernetes]# ls
kubelet.conf  manifests  pki
[root@node103 kubernetes]# rm -rf kubelet.conf
[root@node103 kubernetes]# cd pki
[root@node103 pki]# ls
ca.crt
[root@node103 pki]# rm -rf ca.crt
[root@node103 pki]# kubeadm join 172.17.218.217:6443 --token tervwg.n7t5t3kzz8ool1ki --discovery-token-ca-cert-hash sha256:6ac98b29f9a0ef7bcd0db0f16685671e33d619900a873f0f347e5a2f93559d10
[preflight] Running pre-flight checks
[preflight] Reading configuration from the "kubeadm-config" ConfigMap in namespace "kube-system"...
[preflight] Use 'kubeadm init phase upload-config --config your-config-file' to re-upload it.
[kubelet-start] Writing kubelet configuration to file "/var/lib/kubelet/config.yaml"
[kubelet-start] Writing kubelet environment file with flags to file "/var/lib/kubelet/kubeadm-flags.env"
[kubelet-start] Starting the kubelet
[kubelet-check] Waiting for a healthy kubelet at http://127.0.0.1:10248/healthz. This can take up to 4m0s
[kubelet-check] The kubelet is healthy after 500.820606ms
[kubelet-start] Waiting for the kubelet to perform the TLS Bootstrap

This node has joined the cluster:
* Certificate signing request was sent to apiserver and a response was received.
* The Kubelet was informed of the new secure connection details.

Run 'kubectl get nodes' on the control-plane to see this node join the cluster.添加节点后,查看当前所有节点情况:
[root@node101 ~]# kubectl get nodes
NAME               STATUS   ROLES           AGE   VERSION
cluster-endpoint   Ready    control-plane   8d    v1.33.3
node102            Ready    <none>          47h   v1.33.3
node103 Ready <none> 42m v1.33.38.3 设置主节点参与调度
node101是主节点,默认是不参与pod部署的,如需要担任业务节点的角色可以如下配置:
## Taints翻译为污点,去掉污点既可参与pod部署
[root@node101 ~]# kubectl describe nodes cluster-endpoint |grep node-role
                    node-role.kubernetes.io/control-plane=
Taints:             node-role.kubernetes.io/control-plane:NoSchedule
## 去掉污点 结尾是-减号表示去掉
[root@node101 ~]# kubectl taint node cluster-endpoint node-role.kubernetes.io/control-plane:NoSchedule-NoSchedule表示在k8s集群中,不会将新的Pod调度到有该污点的节点上。
8.4 延长k8s集群证书
默认kubeadm安装的集群,证书默认有效期为1年,可以修改为10年:
## 查看当前证书有效期
[root@node101 ~]# cd /etc/kubernetes/pki/
[root@node101 pki]# for i in $(ls *.crt); do echo "========$1========="; openssl x509 -in $i -text -noout | grep -A 3 "Validity" ; done
=================
        Validity
            Not Before: Jul 29 23:49:07 2025 GMT
            Not After : Jul 29 23:54:07 2026 GMT
        Subject: CN=kube-apiserver
=================
        Validity
            Not Before: Jul 29 23:49:07 2025 GMT
            Not After : Jul 29 23:54:07 2026 GMT
        Subject: CN=kube-apiserver-etcd-client
=================
        Validity
            Not Before: Jul 29 23:49:07 2025 GMT
            Not After : Jul 29 23:54:07 2026 GMT
        Subject: O=kubeadm:cluster-admins, CN=kube-apiserver-kubelet-client
=================
        Validity
            Not Before: Jul 29 23:49:07 2025 GMT
            Not After : Jul 27 23:54:07 2035 GMT
        Subject: CN=kubernetes
=================
        Validity
            Not Before: Jul 29 23:49:07 2025 GMT
            Not After : Jul 27 23:54:07 2035 GMT
        Subject: CN=front-proxy-ca
=================
        Validity
            Not Before: Jul 29 23:49:07 2025 GMT
            Not After : Jul 29 23:54:07 2026 GMT
Subject: CN=front-proxy-client使用第三方工具修改有效期:
## 备份旧证书
mkdir backup_key; cp -rp ./* backup_key/
[root@node101 ~]# git clone https://github.com/yuyicai/update-kube-cert.git
[root@node101 ~]# cd update-kube-cert/
[root@node101 update-kube-cert]# ls
LICENSE  other.md  other-zh_CN.md  README.md  update-kubeadm-cert.sh
[root@node101 update-kube-cert]# sh update-kubeadm-cert.sh all
## 查看证书有效期,发现延长10年
[root@node101 update-kube-cert]# cd /etc/kubernetes/pki/
[root@node101 pki]# for i in $(ls *.crt); do echo "========$1========="; openssl x509 -in $i -text -noout | grep -A 3 "Validity" ; done
=================
        Validity
            Not Before: Aug  7 16:49:29 2025 GMT
            Not After : Aug  5 16:49:29 2035 GMT
        Subject: CN=kube-apiserver
=================
        Validity
            Not Before: Aug  7 16:49:28 2025 GMT
            Not After : Aug  5 16:49:28 2035 GMT
        Subject: CN=kube-apiserver-etcd-client
=================
        Validity
            Not Before: Aug  7 16:49:29 2025 GMT
            Not After : Aug  5 16:49:29 2035 GMT
        Subject: O=kubeadm:cluster-admins, CN=kube-apiserver-kubelet-client
=================
        Validity
            Not Before: Jul 29 23:49:07 2025 GMT
            Not After : Jul 27 23:54:07 2035 GMT
        Subject: CN=kubernetes
=================
        Validity
            Not Before: Jul 29 23:49:07 2025 GMT
            Not After : Jul 27 23:54:07 2035 GMT
        Subject: CN=front-proxy-ca
=================
        Validity
            Not Before: Aug  7 16:49:29 2025 GMT
            Not After : Aug  5 16:49:29 2035 GMT
Subject: CN=front-proxy-client9. 部署Dashboard
K8s官方提供了可视化管理界面,方便K8s集群的管理。最新版本的Dashboard提供helm方式下载安装,安装helm请参考Helm包管理器, 另外从7.x版开始,不再支持基于Manifest的安装。现在只支持基于Helm的安装。
9.1 添加Dashboard源
# 添加 kubernetes-dashboard 仓库
helm repo add kubernetes-dashboard https://kubernetes.github.io/dashboard/9.2 生成配置文件
helm show values kubernetes-dashboard/kubernetes-dashboard > k8s-dashboard.yaml9.3 修改配置文件
## 修改147行:
repository: swr.cn-north-4.myhuaweicloud.com/ddn-k8s/docker.io/kubernetesui/dashboard-auth
## 修改189行;
repository: swr.cn-north-4.myhuaweicloud.com/ddn-k8s/docker.io/kubernetesui/dashboard-api
## 修改312行
repository: swr.cn-north-4.myhuaweicloud.com/ddn-k8s/docker.io/kubernetesui/dashboard-metrics-scraper
## 修改249行
repository: swr.cn-north-4.myhuaweicloud.com/ddn-k8s/docker.io/kubernetesui/dashboard-web9.4 执行安装
[root@node101 ~]# helm install kubernetes-dashboard kubernetes-dashboard/kubernetes-dashboard -n kubernetes-dashboard --create-namespace -f k8s-dashboard.yaml9.5 查看安装运行情况
[root@node101 ~]# kubectl get pods -A
NAMESPACE              NAME                                                    READY   STATUS                  RESTARTS      AGE
kube-system            calico-kube-controllers-6b7cfc4d75-4hht8                1/1     Running                 4 (24m ago)   9d
kube-system            calico-node-25pnt                                       1/1     Running                 2 (24m ago)   2d21h
kube-system            calico-node-f99xn                                       1/1     Running                 4 (24m ago)   9d
kube-system            calico-node-rbhkk                                       1/1     Running                 4 (24m ago)   4d21h
kube-system            coredns-757cc6c8f8-2m6tc                                1/1     Running                 4 (24m ago)   11d
kube-system            coredns-757cc6c8f8-68qkx                                1/1     Running                 4 (24m ago)   11d
kube-system            etcd-cluster-endpoint                                   1/1     Running                 6 (24m ago)   11d
kube-system            kube-apiserver-cluster-endpoint                         1/1     Running                 6 (24m ago)   11d
kube-system            kube-controller-manager-cluster-endpoint                1/1     Running                 6 (24m ago)   11d
kube-system            kube-proxy-27zlc                                        1/1     Running                 4 (24m ago)   4d21h
kube-system            kube-proxy-kcrrf                                        1/1     Running                 2 (24m ago)   2d21h
kube-system            kube-proxy-xcg9l                                        1/1     Running                 5 (24m ago)   11d
kube-system            kube-scheduler-cluster-endpoint                         1/1     Running                 6 (24m ago)   11d
kubernetes-dashboard   kubernetes-dashboard-api-647b849b47-t6zzd               1/1     Running                 1 (24m ago)   2d5h
kubernetes-dashboard   kubernetes-dashboard-auth-856496d66b-qvrx9              1/1     Running                 1 (24m ago)   2d5h
kubernetes-dashboard   kubernetes-dashboard-kong-648658d45f-7l7lp              0/1     Init:ImagePullBackOff   0             2d5h
kubernetes-dashboard   kubernetes-dashboard-metrics-scraper-79988d66c9-w9vm5   1/1     Running                 1 (24m ago)   2d5h
kubernetes-dashboard kubernetes-dashboard-web-699f775476-t44jl 1/1 Running 1 (24m ago) 2d5h可以看到kubernetes-dashboard-kong的镜像拉取失败,因为已经部署,需要编辑Deployment:
kubectl edit deployment kubernetes-dashboard-kong -n kubernetes-dashboard在编辑器中找到spec.template.spec.containers.image,替换为:
## 一共有两处image,都进行替换
image: swr.cn-north-4.myhuaweicloud.com/ddn-k8s/docker.io/library/kong:3.8替换后后保存退出会自动k8s重新部署,查看部署情况:
[root@node101 ~]# kubectl get pods -A |grep kubernetes-dashboard
kubernetes-dashboard   kubernetes-dashboard-api-647b849b47-t6zzd               1/1     Running   1 (136m ago)   2d7h
kubernetes-dashboard   kubernetes-dashboard-auth-856496d66b-qvrx9              1/1     Running   1 (136m ago)   2d7h
kubernetes-dashboard   kubernetes-dashboard-kong-846576b479-wkl4l              1/1     Running   0              103m
kubernetes-dashboard   kubernetes-dashboard-metrics-scraper-79988d66c9-w9vm5   1/1     Running   1 (136m ago)   2d7h
kubernetes-dashboard kubernetes-dashboard-web-699f775476-t44jl 1/1 Running 1 (136m ago) 2d7h9.6 配置对外访问
此时查看kubernetes-dashboard-kong-846576b479-wkl4l的访问端口:
[root@node101 ~]# kubectl get svc -A
NAMESPACE              NAME                                   TYPE        CLUSTER-IP       EXTERNAL-IP   PORT(S)                  AGE
default                kubernetes                             ClusterIP   10.96.0.1        <none>        443/TCP                  11d
kube-system            kube-dns                               ClusterIP   10.96.0.10       <none>        53/UDP,53/TCP,9153/TCP   11d
kubernetes-dashboard   kubernetes-dashboard-api               ClusterIP   10.100.203.92    <none>        8000/TCP                 2d6h
kubernetes-dashboard   kubernetes-dashboard-auth              ClusterIP   10.104.68.46     <none>        8000/TCP                 2d6h
kubernetes-dashboard   kubernetes-dashboard-kong-proxy        ClusterIP   10.109.148.178   <none>        443/TCP                  2d6h
kubernetes-dashboard   kubernetes-dashboard-metrics-scraper   ClusterIP   10.101.150.36    <none>        8000/TCP                 2d6h
kubernetes-dashboard kubernetes-dashboard-web ClusterIP 10.96.125.245 <none> 8000/TCP 2d6h如果直接通过公网IP访问,会发现访问不通,原因时当前模式ClusterIP,也就是直接访问kubernetes-dashboard-web是不可行的,可以通过kubernetes-dashboard-kong-proxy, kubernetes-dashboard-kong-proxy本来就是用来提供对外访问kubernetes-dashboard的,需要配置任意地址都可以访问:
## 支持任意地址访问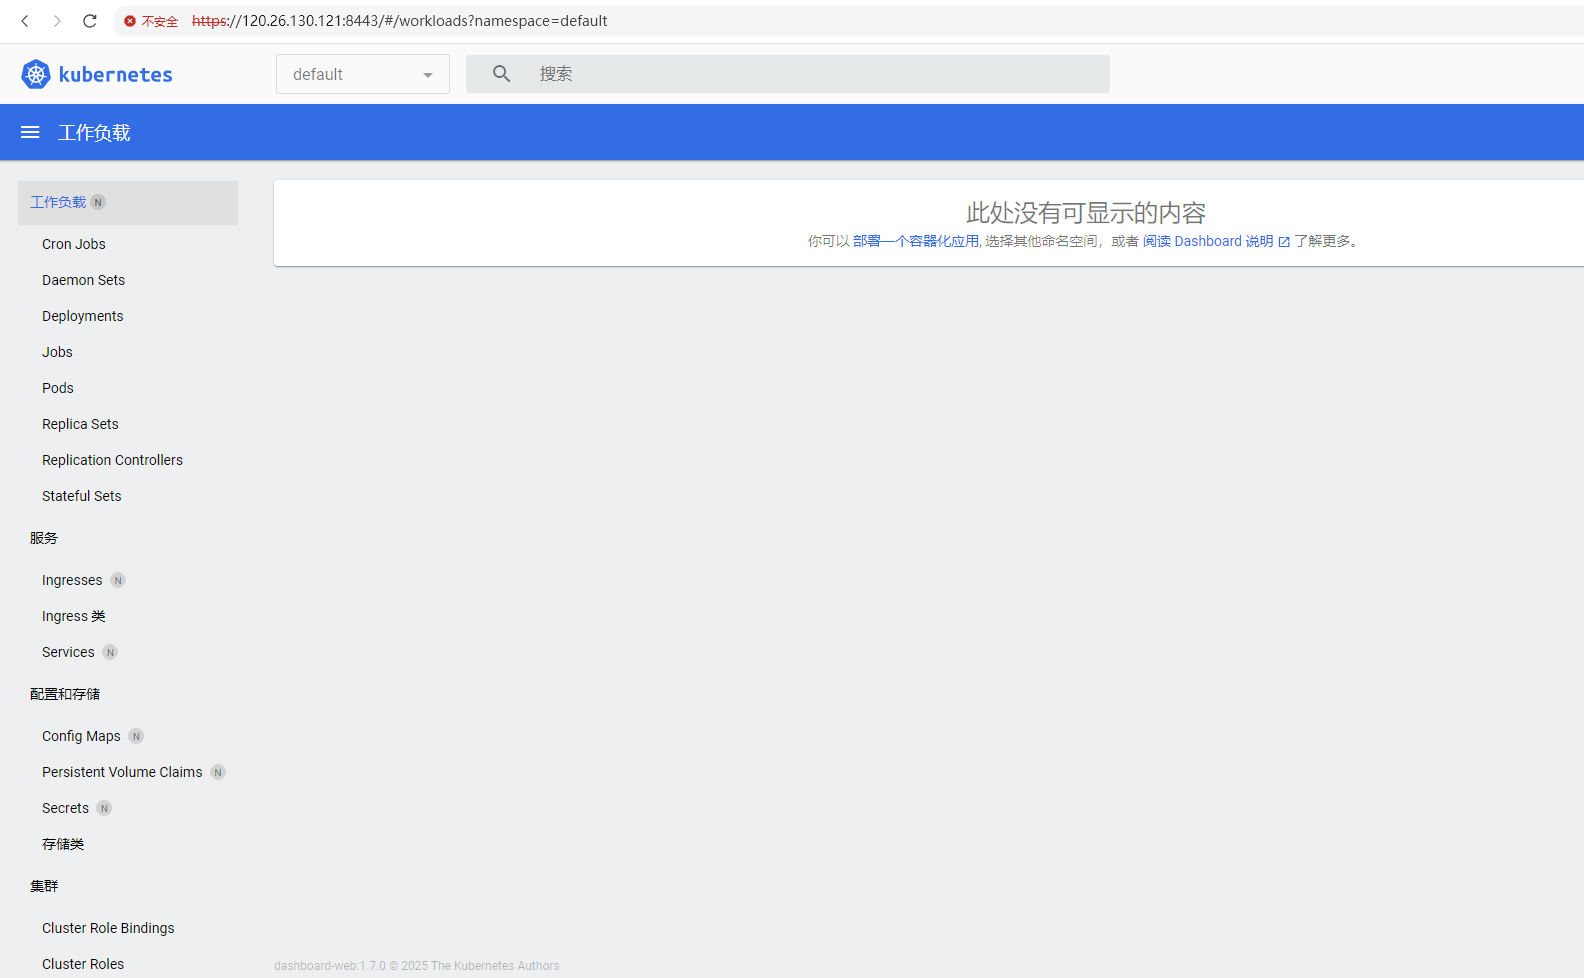
[root@node101 ~]# kubectl -n kubernetes-dashboard port-forward svc/kubernetes-dashboard-kong-proxy 8443:443 --address 0.0.0.0 &此时https://120.26.130.121:8443/ ,会自动跳转到登录页面: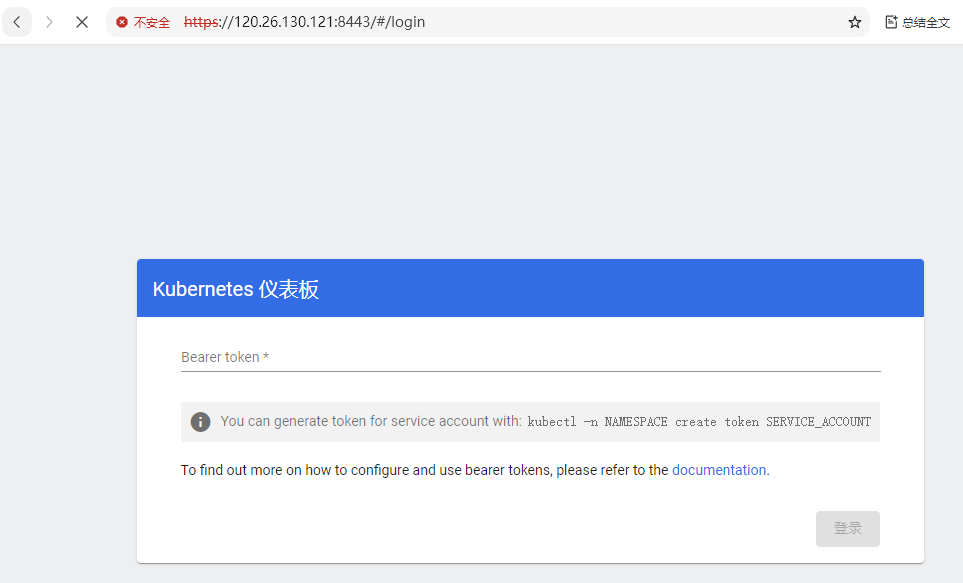 页面要求输入token, 需要创建用户。
9.7 创建用户和Token
K8S有两种用户:User和Service Account,User给人用,Service Account给进程用,让进程有相关权限,通过命令、yml方式都可以创建用户和绑定角色:
# 创建 ServiceAccount(管理员账户)
kubectl create serviceaccount admin01 -n kubernetes-dashboard

# 绑定 ClusterRoleBinding(授予集群管理员权限)
kubectl create clusterrolebinding admin01 --clusterrole=cluster-admin \
--serviceaccount=kubernetes-dashboard:admin01创建对应服务账号的token:
##
[root@node101 ~]# kubectl -n kubernetes-dashboard create token admin01 --duration 24h
eyJhbGciOiJSUzI1NiIsImtpZCI6IjlyQzYtbkkwamtNU2ROcGVxQzBZdGtOU2JtSFkxdjN4V184azg3c2VRRVkifQ.eyJhdWQiOlsiaHR0cHM6Ly9rdWJlcm5ldGVzLmRlZmF1bHQuc3ZjLmNsdXN0ZXIubG9jYWwiXSwiZXhwIjoxNzU0OTMxMzYyLCJpYXQiOjE3NTQ4NDQ5NjIsImlzcyI6Imh0dHBzOi8va3ViZXJuZXRlcy5kZWZhdWx0LnN2Yy5jbHVzdGVyLmxvY2FsIiwianRpIjoiNDIyYjFjYmYtNTEzNy00YjQ4LTg3N2QtNzEyY2E5MjdiN2Y2Iiwia3ViZXJuZXRlcy5pbyI6eyJuYW1lc3BhY2UiOiJrdWJlcm5ldGVzLWRhc2hib2FyZCIsInNlcnZpY2VhY2NvdW50Ijp7Im5hbWUiOiJhZG1pbjAxIiwidWlkIjoiNTJmZjRjMTktYmQxMi00YmZjLTgyMWEtNDNhMGYxMzQ5YjIyIn19LCJuYmYiOjE3NTQ4NDQ5NjIsInN1YiI6InN5c3RlbTpzZXJ2aWNlYWNjb3VudDprdWJlcm5ldGVzLWRhc2hib2FyZDphZG1pbjAxIn0.TbQxvFaxgq9TLNjHDtxfORM9IN4xOtruCjkMV6AjatPWitQ30V0_4VEBwgbuX6yorXjiT86Sg509iKM0X_WqeXwdYVK-xE0M4M3gsmot01_K_MToNKW4b2Vdo0E256syPlDsEYuN4uojwvDKGaoM7RGPdF1pnawvH5kwVcUy0kNQztA-0rhw-iqd5D49Gp1SQTOaTQ1vY0lwXoRhn8wfyTaOCNC2rBZBasgPVBGhmOwfp09EGqFvmKvfdAK5WmwniyrOVSedSgFSKut0DsZgBavjXSJhOOM0TS8vgt6nDYK0sjypVi0LjvbOqNd4LwFIQ20Rq0KiOWYkLUsbSVxFsA在页面上输入Token以后,登录Dashboard: