Pod
Pod是可以在Kubernetes中创建和管理的、最小的可部署的计算单元。Pod由一个或多个运行中的容器组成。 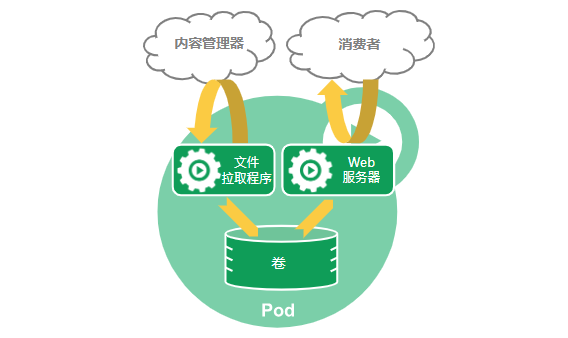 查看Pod中有几个容器:
1. 创建Pod
sh
[root@node101 ~]# kubectl create ns zk-dev
namespace/zk-dev created
[root@node101 ~]# kubectl run mynginx --image=nginx -n zk-dev
pod/mynginx created判断当前mynginx启动情况:
sh
[root@node101 ~]# kubectl get pod -n zk-dev
NAME      READY   STATUS    RESTARTS      AGE
mynginx 1/1 Running 1 (12m ago) 1m若处于Running状态表明已经启动完毕。并在node102上发现确实有mynginx:
sh
[root@node102 ~]# crictl images
WARN[0000] Config "/etc/crictl.yaml" does not exist, trying next: "/usr/bin/crictl.yaml"
WARN[0000] Image connect using default endpoints: [unix:///run/containerd/containerd.sock unix:///run/crio/crio.sock unix:///var/run/cri-dockerd.sock]. As the default settings are now deprecated, you should set the endpoint instead.
IMAGE                                                                           TAG                 IMAGE ID            SIZE
docker.io/library/nginx                                                         latest              605c77e624ddb       56.7MB
registry.aliyuncs.com/google_containers/kube-proxy                              v1.33.0             f1184a0bd7fe5       31.9MB
registry.aliyuncs.com/google_containers/pause                                   3.8                 4873874c08efc       311kB
swr.cn-north-4.myhuaweicloud.com/ddn-k8s/docker.io/calico/cni                   v3.25.0             d70a5947d57e5       88MB
swr.cn-north-4.myhuaweicloud.com/ddn-k8s/docker.io/calico/node                  v3.25.0             08616d26b8e74       87.2MB
swr.cn-north-4.myhuaweicloud.com/ddn-k8s/docker.io/kubernetesui/dashboard-api   1.13.0              9e7701f8aae8a       16.6MB
swr.cn-north-4.myhuaweicloud.com/ddn-k8s/docker.io/kubernetesui/dashboard-web 1.7.0 59f642f485d26 62.5MB还可以通过YAML文件创建Pod, 在需要复杂配置Pod的时候推荐使用,创建alpine-pod.yaml:
yml
apiVersion: v1
kind: Pod
metadata:
  name: myalpine # Pod名称
  namespace: zk-dev # 名称空间
spec:
  containers:
  - name: alpine-container   # 容器名称
    image: alpine:latest
    command: ["sleep", "infinity"]  # 保持容器运行的命令
    resources:
      limits:
        cpu: "100m"         # 限制CPU使用率
        memory: "64Mi"      # 限制内存使用
      requests:
        cpu: "50m"          # 请求的最小CPU
        memory: "32Mi"      # 请求的最小内存
restartPolicy: Always # 重启策略运行pod,应用alpine-pod.yaml文件:
sh
[root@node101 ~]# kubectl apply -f alpine-pod.yaml
pod/myalpine created
[root@node101 ~]# kubectl get pod -n zk-dev
NAME       READY   STATUS    RESTARTS   AGE
myalpine 1/1 Running 0 26s2. 查看Pod详情
查看具体Pod的IP和部署节点信息:
sh
[root@node101 ~]# kubectl get pod -n zk-dev -owide
NAME       READY   STATUS    RESTARTS   AGE    IP               NODE      NOMINATED NODE   READINESS GATES
myalpine   1/1     Running   0          18m    192.168.200.81   node102   <none>           <none>
mynginx 1/1 Running 0 3m3s 192.168.200.82 node102 <none> <none>若要查看创建Pod过程:
sh
[root@node101 ~]# kubectl describe pod  mynginx -n zk-dev
Name:             mynginx
Namespace:        zk-dev
Priority:         0
Service Account:  default
Node:             node102/172.17.218.219
Start Time:       Tue, 12 Aug 2025 01:01:38 +0800
Labels:           run=mynginx
Annotations:      cni.projectcalico.org/containerID: e5ab1ba48ef7dc8b1832debe7a39e1b90a682632f4d961b0b5f13918f15c9466
                  cni.projectcalico.org/podIP: 192.168.200.76/32
                  cni.projectcalico.org/podIPs: 192.168.200.76/32
Status:           Running
IP:               192.168.200.76
IPs:
  IP:  192.168.200.76
Containers:
  mynginx:
    Container ID:   containerd://afc99a989c9a22d3eae91d869e5de540195f9ff8c373595ad39f5a32c05b62f4
    Image:          nginx
    Image ID:       docker.io/library/nginx@sha256:0d17b565c37bcbd895e9d92315a05c1c3c9a29f762b011a10c54a66cd53c9b31
    Port:           <none>
    Host Port:      <none>
    State:          Running
      Started:      Tue, 12 Aug 2025 01:01:43 +0800
    Ready:          True
    Restart Count:  0
    Environment:    <none>
    Mounts:
      /var/run/secrets/kubernetes.io/serviceaccount from kube-api-access-v7kvh (ro)
Conditions:
  Type                        Status
  PodReadyToStartContainers   True
  Initialized                 True
  Ready                       True
  ContainersReady             True
  PodScheduled                True
Volumes:
  kube-api-access-v7kvh:
    Type:                    Projected (a volume that contains injected data from multiple sources)
    TokenExpirationSeconds:  3607
    ConfigMapName:           kube-root-ca.crt
    Optional:                false
    DownwardAPI:             true
QoS Class:                   BestEffort
Node-Selectors:              <none>
Tolerations:                 node.kubernetes.io/not-ready:NoExecute op=Exists for 300s
                             node.kubernetes.io/unreachable:NoExecute op=Exists for 300s
Events:
  Type    Reason     Age    From               Message
  ----    ------     ----   ----               -------
  Normal  Scheduled  2m51s  default-scheduler  Successfully assigned zk-dev/mynginx to node102
  Normal  Pulling    2m51s  kubelet            Pulling image "nginx"
  Normal  Pulled     2m46s  kubelet            Successfully pulled image "nginx" in 4.836s (4.836s including waiting). Image size: 56722276 bytes.
  Normal  Created    2m46s  kubelet            Created container: mynginx
Normal Started 2m46s kubelet Started container mynginx主要是看Events的内容,可以看到当前nginx运行被分配到了node102机器上面。
3. 删除Pod
sh
[root@node101 ~]# kubectl delete pod  mynginx -n zk-dev
pod "mynginx" deleted
## 通过yml文件删除pod
[root@node101 ~]# kubectl delete -f alpine-pod.yaml
pod "myalpine" deleted4. 通过Dashboard创建Pod
在Dashboard页面上创建Pod需要指定名称空间,菜单带有N的都表示功能和名称空间有关: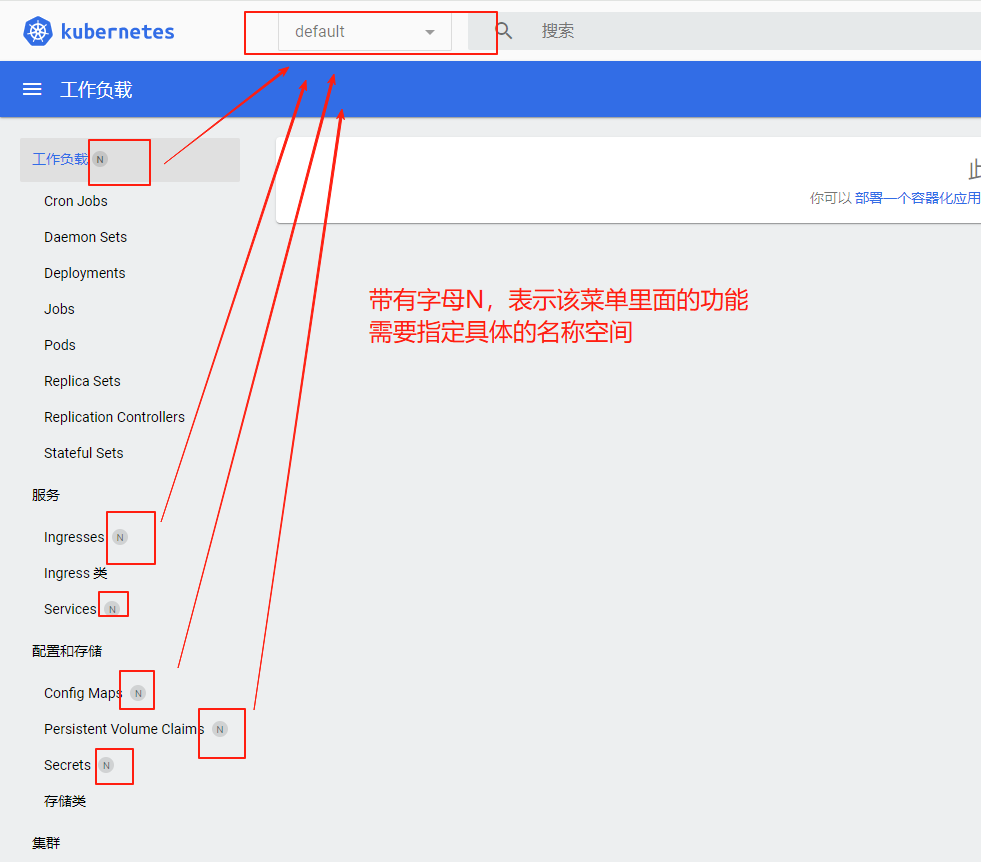 点击右上角的+, 创建Pod在Dashboard上有三种方式,使用输入并创建方式:
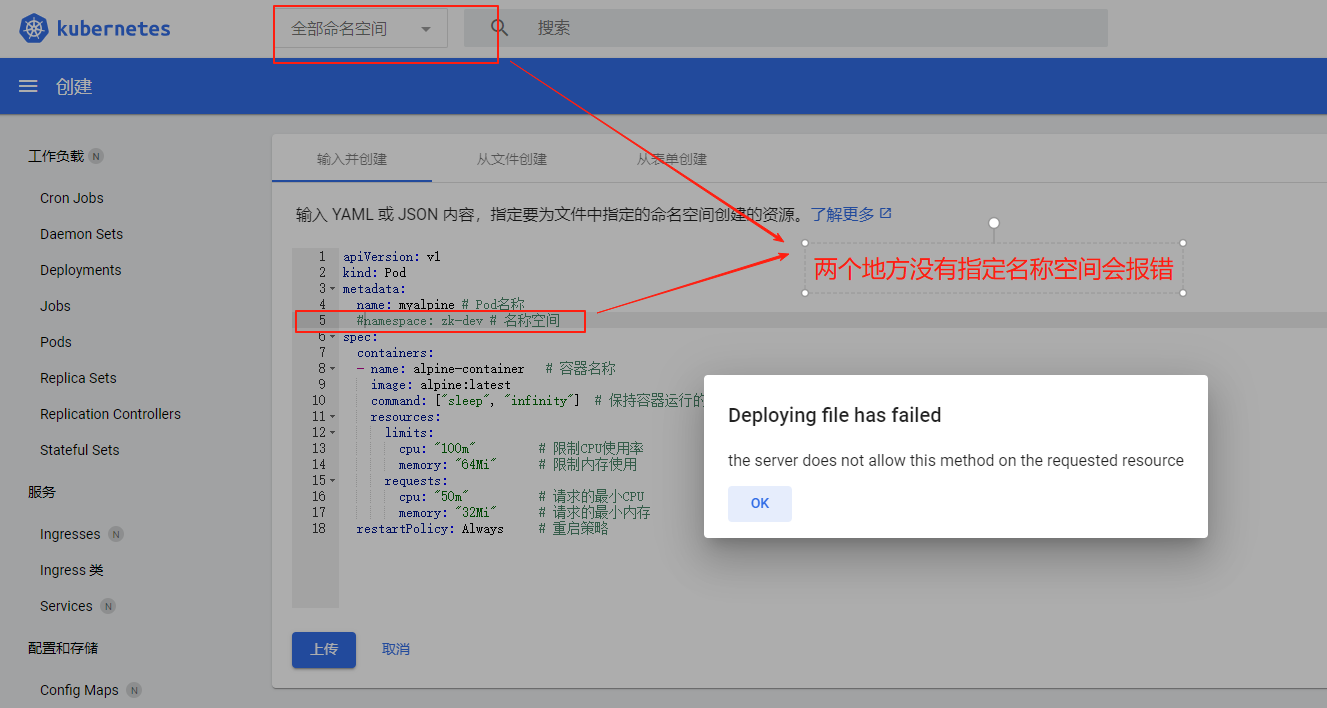 在左上角选择zk-dev名称空间,再次点击上传按钮:
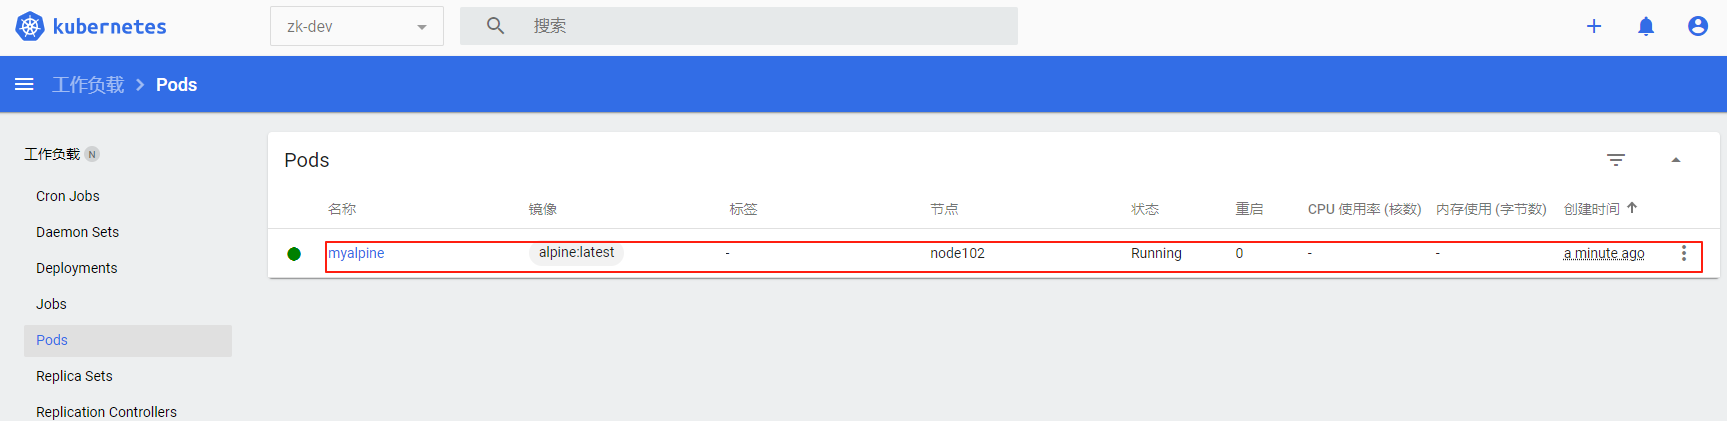 刷新页面发现已经创建Pod成功,点击进入可以查看详情:
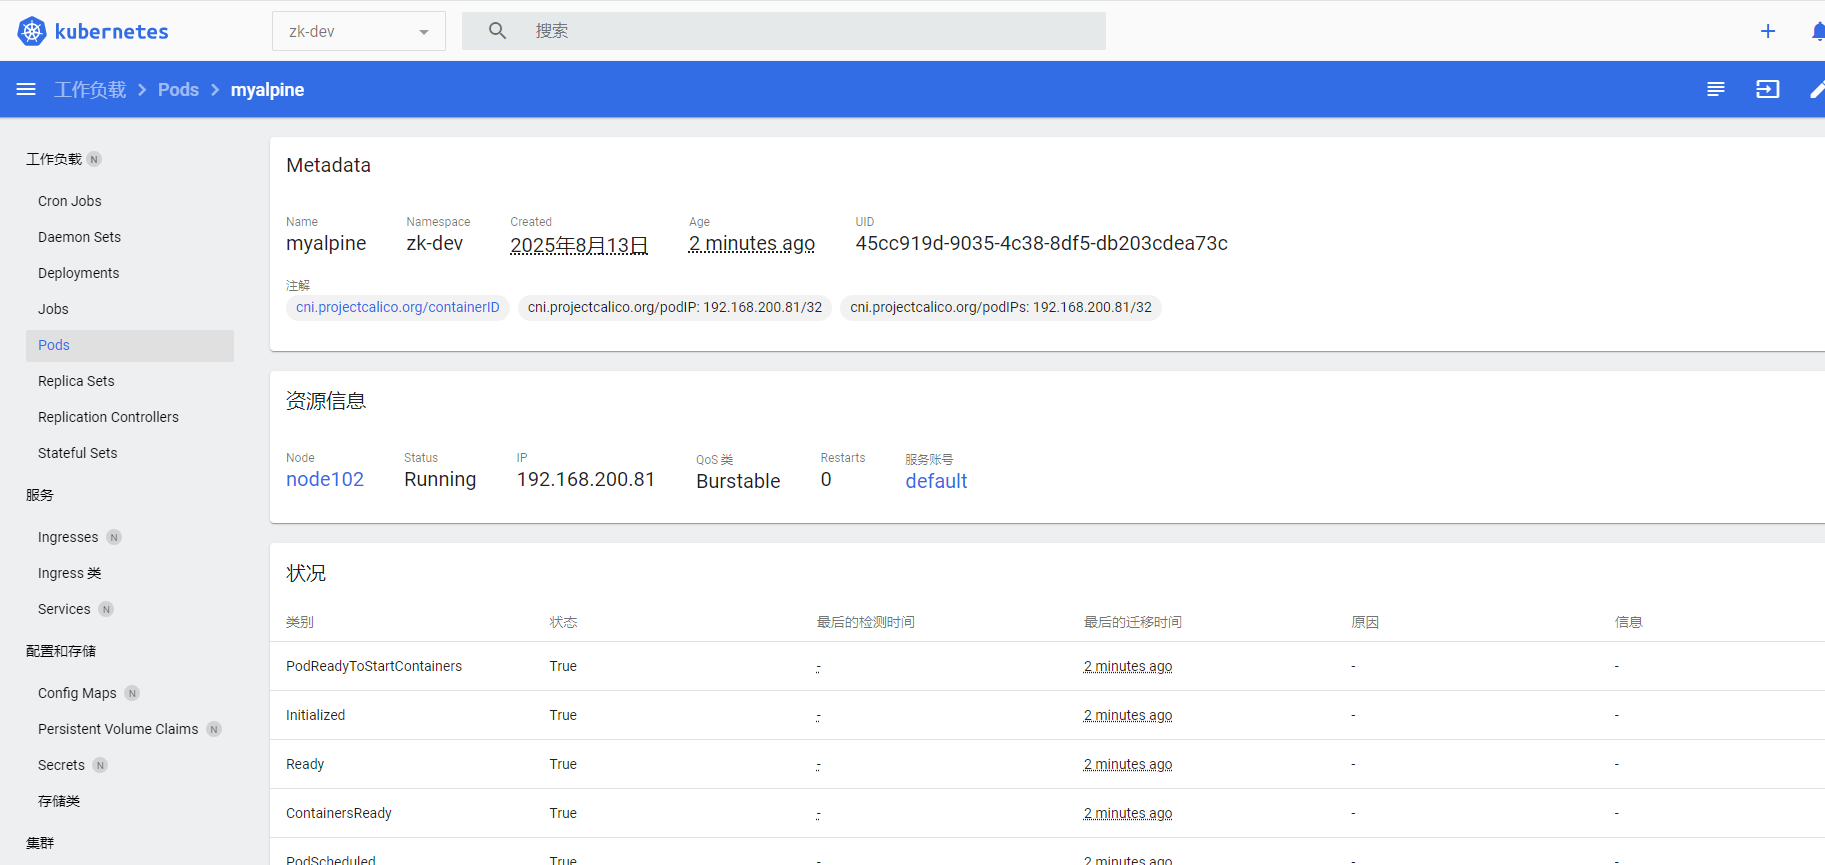 在右边有操作按钮,可以对Pod进行操作:
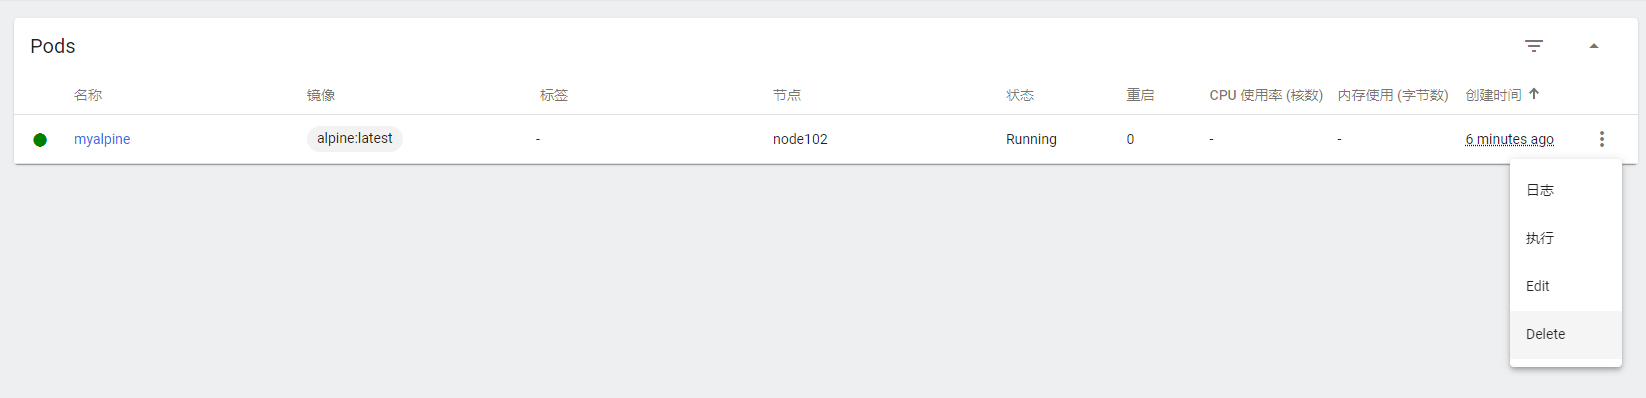
5. 查看Pod日志
sh
[root@node101 ~]# kubectl logs -f mynginx -n zk-dev
/docker-entrypoint.sh: /docker-entrypoint.d/ is not empty, will attempt to perform configuration
/docker-entrypoint.sh: Looking for shell scripts in /docker-entrypoint.d/
/docker-entrypoint.sh: Launching /docker-entrypoint.d/10-listen-on-ipv6-by-default.sh
10-listen-on-ipv6-by-default.sh: info: Getting the checksum of /etc/nginx/conf.d/default.conf
10-listen-on-ipv6-by-default.sh: info: Enabled listen on IPv6 in /etc/nginx/conf.d/default.conf
/docker-entrypoint.sh: Launching /docker-entrypoint.d/20-envsubst-on-templates.sh
/docker-entrypoint.sh: Launching /docker-entrypoint.d/30-tune-worker-processes.sh
/docker-entrypoint.sh: Configuration complete; ready for start up
2025/08/12 22:40:08 [notice] 1#1: using the "epoll" event method
2025/08/12 22:40:08 [notice] 1#1: nginx/1.21.5
2025/08/12 22:40:08 [notice] 1#1: built by gcc 10.2.1 20210110 (Debian 10.2.1-6)
2025/08/12 22:40:08 [notice] 1#1: OS: Linux 5.14.0-570.23.1.el9_6.x86_64
2025/08/12 22:40:08 [notice] 1#1: getrlimit(RLIMIT_NOFILE): 1073741816:1073741816
2025/08/12 22:40:08 [notice] 1#1: start worker processes
2025/08/12 22:40:08 [notice] 1#1: start worker process 31
2025/08/12 22:40:08 [notice] 1#1: start worker process 32
2025/08/12 22:40:08 [notice] 1#1: start worker process 33
2025/08/12 22:40:08 [notice] 1#1: start worker process 34
2025/08/12 22:40:08 [notice] 1#1: start worker process 35
2025/08/12 22:40:08 [notice] 1#1: start worker process 36
2025/08/12 22:40:08 [notice] 1#1: start worker process 37
2025/08/12 22:40:08 [notice] 1#1: start worker process 386. 进入Pod内部
比如现在要更改mynginx里面的index.html:
sh
[root@node101 ~]# kubectl exec -it mynginx -n zk-dev -- /bin/bash
root@mynginx:/# ls /
bin  boot  dev  docker-entrypoint.d  docker-entrypoint.sh  etc  home  lib  lib64  media  mnt  opt  proc  root  run  sbin  srv  sys  tmp  usr  var
root@mynginx:/# cd /usr/share/nginx/html/
root@mynginx:/usr/share/nginx/html# ls
50x.html index.html在Dashboard中,也支持进入Pod内部, 在Pod操作栏中,选择Exec(执行):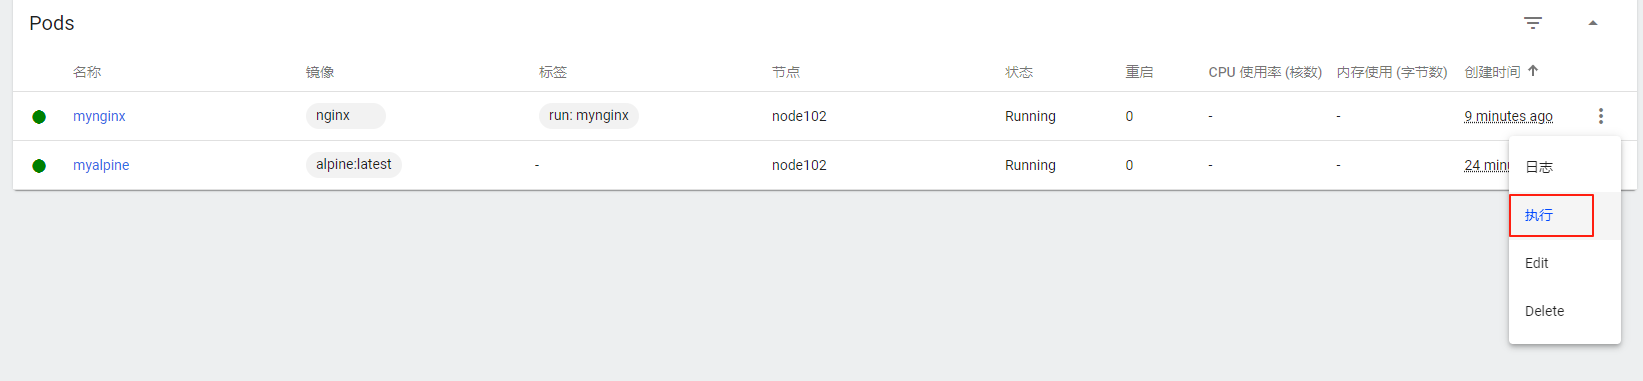 进入命令行界面,其余操作和shell中一样:
7. 创建多容器Pod
创建Pod里面包含Tomcat和Nginx容器的实例:
sh
[root@node101 ~]# vim multi-pod.yml
## 添加如下内容
apiVersion: v1
kind: Pod
metadata:
  labels:
    run: myApp
  name: myApp
  namespace: zk-dev
spec:
  containers:
  - name: nginx
    image: nginx
  - name: tomcat
image: swr.cn-north-4.myhuaweicloud.com/ddn-k8s/docker.io/tomcat:8.5.95-jdk8应用multi-pod.yml文件:
sh
[root@node101 ~]# kubectl apply -f multi-pod.yml
The Pod "myApp" is invalid:
* metadata.name: Invalid value: "myApp": a lowercase RFC 1123 subdomain must consist of lower case alphanumeric characters, '-' or '.', and must start and end with an alphanumeric character (e.g. 'example.com', regex used for validation is '[a-z0-9]([-a-z0-9]*[a-z0-9])?(\.[a-z0-9]([-a-z0-9]*[a-z0-9])?)*')
* spec.containers[1].name: Invalid value: "tomcat:8.5.95-jdk8": a lowercase RFC 1123 label must consist of lower case alphanumeric characters or '-', and must start and end with an alphanumeric character (e.g. 'my-name', or '123-abc', regex used for validation is '[a-z0-9]([-a-z0-9]*[a-z0-9])?')提示不能使用myApp名字,只能使用风格为多个单词中间用-或者.分开的命名规则,调整名称为myapp, 再次执行:
sh
[root@node101 ~]# kubectl apply -f multi-pod.yml
pod/myapp created
[root@node101 ~]# kubectl get pod -n zk-dev
NAME       READY   STATUS    RESTARTS   AGE
myalpine   1/1     Running   0          90m
myapp      2/2     Running   0          13m
mynginx 1/1 Running 0 75m登录Dashboard页面中,查看可以看到myapp的Pod里面有两个容器: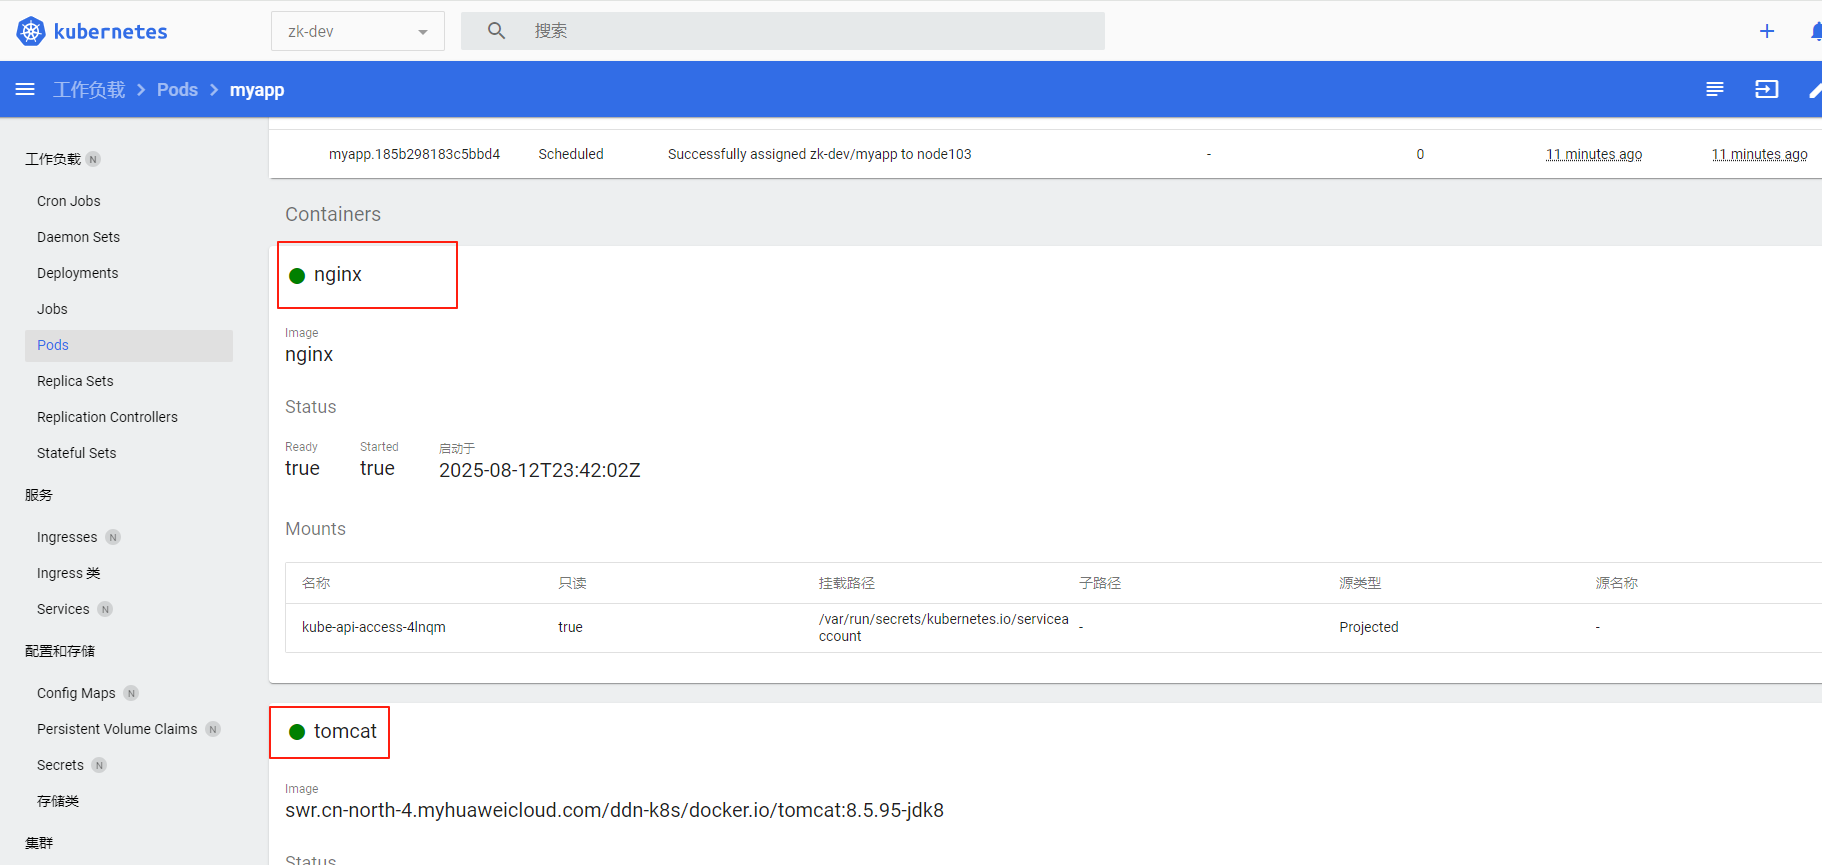
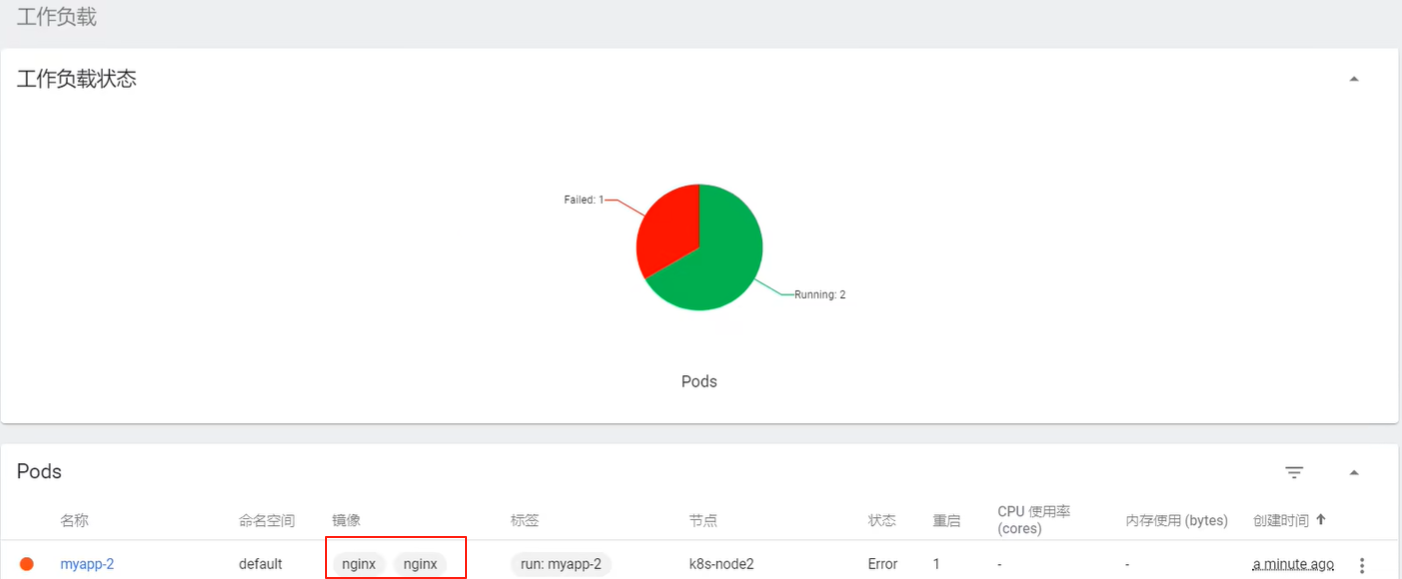
同一个Pod中不能部署多个相同的容器
在Pod中部署两个nginx, 会有一个nginx报错端口已经被占用: